|
By Dan - 16 Years Ago
|
|
Here are some more pics of our shop project - nothing too exciting to report but progress is slowly moving forward: Pretty much have all the parts painted, earlier someone asked about the color and it is supposed to be Ford Red, at least according to what the can says - we are using a Duplicolor ceramic engine enamel in a spray can. Under that is a Napa self etching primer. Have one head knurled and glyptaled. The knurling will suffice for now, I am looking into getting set up with valve guide replacement equipment, if I do we will install bronze (?? is that what we want ??) guides. Plan to glyptal the lifter valley as well. Any benefit in glyptal inside the oil pan, valve covers, water pump cover, etc.??? The 2bbl and intake will be used for now until I can find a 4bbl intake (or something cooler  ) We are deburring the outside of the manifold for looks and plan to gasket match the intake to the heads. We dont have a flow bench so that will probably be the extent of any port & polish type work. Playing around with different cutters and sanding rolls on the air grinder, what is the best speed and how do you acheive it to cut this cast iron?? It's slow going... The big chrome air cleaner will be replace with a smaller (I think they called them "helmet" or "mushroom" type) more period looking piece when I find one. Need to find out what our exact cam specs are before I settle on a carb... ) We are deburring the outside of the manifold for looks and plan to gasket match the intake to the heads. We dont have a flow bench so that will probably be the extent of any port & polish type work. Playing around with different cutters and sanding rolls on the air grinder, what is the best speed and how do you acheive it to cut this cast iron?? It's slow going... The big chrome air cleaner will be replace with a smaller (I think they called them "helmet" or "mushroom" type) more period looking piece when I find one. Need to find out what our exact cam specs are before I settle on a carb... Still waiting to buy all our gaskets, bearings, etc. What is the verdict on a rebuild kit for the water pump? A new one is not that much more than the kit (at RockAuto.Com) should we even mess around rebuilding one? I thin it would be funner than just bolting on a new piece, but will it work okay??? Definately think we will get a rebuild kit for the oil pump - that is way cheaper than a new one. Hope to eventually put a Pertronix in the dist. but may just go with points for now. I thin we will make some header flanges from 3/8 plate. I help up a set of SBC block huggers the other day and I think we may be able to canabalize them and make them work on some new flanges, maybe not, we'll have to see. The blue engine is a student engine. it basically underwent a "Krylon" rebuild - I let him go on his own so we will see how he did. He plans to install it (I think) into a Willys p/u - dont know if that is a feasible swap or not, guess we'll find out! Thanks for listening, and a huge thanks for all the advise and parts - this is a great board!!! 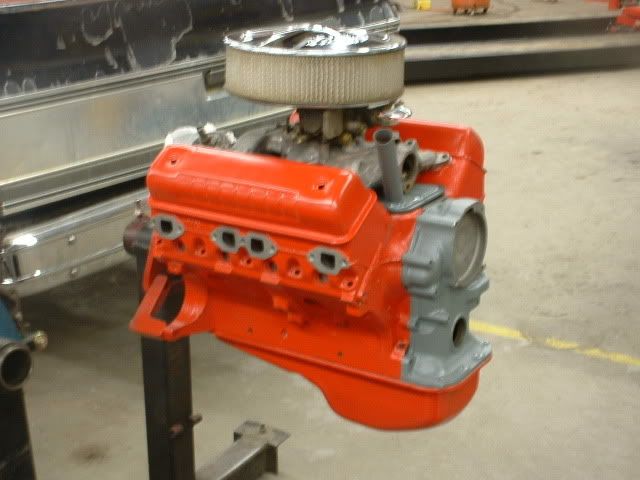


|
|
By Hoosier Hurricane - 16 Years Ago
|
|
Dan: Nice pictures, great report. What is the coupe, '41-'48, Ford or Merc? As for the water pump, since cost isn't a major issue, is rebuilding the old one a viable learning experience for the students? It's not likely they will ever have to do it again, kits are not usually locally available, but rebuilt and new pumps are. Keep the reports coming. John in Selma, IN
|
|
By Unibodyguy - 16 Years Ago
|
|
Dan, thanks for the progress updates. Thats so cool you have them doing a Yblock insted of something else. Michael
|
|
By GREENBIRD56 - 16 Years Ago
|
|
I once saw a report about the use of the "Glyptol" electric motor sealant on the inner surfaces of some test engines (NASCAR). Engine oil temperature was said to have risen with that single difference between two otherwise equal motors. It was said to relate to the speed at which the oil returned to the sump. Glyptol will certainly seal the cast surfaces and prevent contamination of the oil with grit, But - and I have seen this with the big gearcases on the mining machines I often work with - it also provides a very slick surface that returns the oil quickly to the sump - without absorbing enough heat from the oil. Sand blasting (and then scrubbing like hell) the inside of the gearboxes (removing the "oil proof" coating) caused their skin temperature to go up - and the sump temperature to reduce (and that is where I was scavenging lubricant to spray into the bearings and gear tooth meshes). This prevented us from having to go to the expense (and additional failure risk) of pumped coolers. I have heard that there are some aerospace coatings - that seal surfaces well and ....increase the heat absorbtion rate. It is also something I have not researched enough to be competent at explaining. It might be a worthwhile thing for engine builders to look in to.
|
|
By Dan - 16 Years Ago
|
|
Interesting thought on the glyptal raising oil temp., kinda like removing the thermostat and raising the coolant temp. Never have used the stuff before - new territory for me, interested to see how it works. Yeah a rebuild kit is $20ish and a new (remanned I'm sure) is like $40ish so cost wise its a wash. I think rebuilding one would be a good learning experience, in fact one of the students started on it this morning. How does the hub come off the shaft? Do we use a puller and pull it off? Cant find anything holding it on??? The coupe is a '46 merc...
|
|
By GREENBIRD56 - 16 Years Ago
|
|
Dan - The nose hub where the fan mounts will (nornally) simply press off straight off the shaft. Keep this in mind later when you are trying to get all of the pulleys lined up (and thus keep the belt on there). That flange can be relocated at just the right spot to line up with the crank pulley if you dry assemble the waterpump (don't glue in the gaskets) for a trial.
|
|
By Dan - 16 Years Ago
|
|
good tip, thanks!
|
|
By Dan - 16 Years Ago
|
|
We pulled the fan hub off with no real problem, the clip that goes into the water pump snout is missing. Does the impellar come off the shaft or is it supposed to stay on? If the imp. is supposed to stay the shaft presses out the back of the pump? If the imp. does come off is the shaft supposed to press out the front?? All I have is an exploded parts diagram w/o any direction on which way to proceed??? thanks-
|
|
By GREENBIRD56 - 16 Years Ago
|
|
The shaft/impellor/bearing/seal - all come out the backside (block side) together. What all came in your repair kit? I've never really seen one - just tore down an old rusty pump to get the dimensions off the impellor. The "clip" was left behind in the nose of the housing..........the bearing fit seemed to hold everything together in my "antique". The clip must set the forward position of the bearing.
|
|
By Dan - 16 Years Ago
|
|
Dont have the kit yet, maybe should've waited till we got it before we took it apart think I'll buy this kit http://www.parts123.com/parts123/yb.dll?parta~partsort from Mac's, only one I've found but then I havent looked real hard either... We tried pressing everything out the engine side of the pump and met with alot of resistance. Found an old Motors manual that said to pull the impellor of the shaft - our impellor was already broken so we pressed everything out the front of the pump - came apart real easy that way, guess I just need to order the rebuild kit now. Inside of the pump is pretty rusty, gonna try soaking the whole thing in vinegar after it gets cleaned - had pretty good luck in the past with that method to remove rust.
|
|
By PF Arcand - 16 Years Ago
|
|
Dan: glad your project is coming along..however the engine color is absolutely not Ford Red. That appears to be C-e-y (spit, cough) orange. Suggest you at least paint the valve covers in original Black..
|
|
By Ted - 16 Years Ago
|
|
PF Arcand (1/6/2009)
Dan: glad your project is coming along..however the engine color is absolutely not Ford Red. That appears to be C-e-y (spit, cough) orange. Suggest you at least paint the valve covers in original Black..Paul. Surely you meant to say scrub orange? You don't have to cough as loud when saying it this way.
|
|
By Dan - 16 Years Ago
|
|
As for the color maybe my subconcious is fighting this turn to the dark side Honestly I wouldnt know Ford Red if it slapped me in the face - I just grabbed a couple cans at the parts house and that is what the label said - it is Duplicolor spray paint DE1605 if you are wanting to avoid that color. Its not a resto anyhow so I'm not too concerned with originality - I like this color okay. As for the valve covers they will stay this color for the time being but I'm thinking about putting some "Thunderbird" decals or something like that on them, gotta look at a catalog and look at the ones available. Havent found any chrome ones that I think will look good on this particular project and from what I've read here the cheap chrome ones on Ebay are just exactly that. The finned aluminum ones would be awesome but right now in the project that is money better spent getting it running than looking cool. We are getting ready to fire the blue student engine and am trying to figure out how to mount it to our test stand. I am guessing the two vertical bolt holes (about 2 1/2" apart) on the side of the block are where side engine mounts would go? If so we can easily enough fab. some brackets to mount to the test stand but I also need to figure out how to mount the oran...err, red engine in the T. Thanks-
|
|
By charliemccraney - 16 Years Ago
|
Could be that the camera/computer is not representing the color accurately.
The bosses on the side of the engine are for mounting in cars and will work will for the stand. You'll need to find at least a 3rd mounting point, though.
There is a truck bellhousing, timing cover, and front mount listed in the classifieds. One or all of those could help with mounting in the T.
http://www.y-blocksforever.com/forums/Topic20462-7-1.aspx
|
|
By Dan - 16 Years Ago
|
|
cool, thanks - the third mount will be the bellhousing on the test stand (very similar to an engine stand) I've got a couple ideas to kick around for mounting in the T...
|
|
By rgrove - 16 Years Ago
|
|
Dan (1/7/2009)
As for the valve covers they will stay this color for the time being but I'm thinking about putting some "Thunderbird" decals or something like that on them, gotta look at a catalog and look at the ones available. I might have some thunderbird (292, not 312 Special) decals. Email me your address and if I can find them Ill drop them in the mail. rongrove(at)comcast(dot)net. However, they will look like poop unless you paint the valve covers black. You wont see the contrast, as the script is white, etc. The ones I have arent water transfers, which is all I could find in catalogs. Those dont look right and wrinkle up with use. I had a local decal shop make some really nice ones in clear vinyl and die cut. Like I said, if i can find an extra set, ill send 'em off.
|
|
By pegleg - 16 Years Ago
|
|
I would be interested in a set if you have another one. Send me a PM with the price please.
|
|
By rgrove - 16 Years Ago
|
|
Hey guys, sorry for the delay. Been on the road like crazy for work lately. Of ocurse, I cheated and went last weekend in AZ and went to Barret Jackson...not nearly as good as previous years, BTW) Ill dig through the files to see if I can find the decals and update. thanks for the patience!
|
|
By Dan - 16 Years Ago
|
|
very cool, thanks!
|
|
By rgrove - 16 Years Ago
|
pegleg (1/10/2009)
I would be interested in a set if you have another one. Send me a PM with the price please. Ok, I finally found it! I am REALLY sorry for the delay. Work has been stupid busy, mostly on the road lately, and at this point Im just glad to have a job, so I cant complain too much.... Frank, I only have one more set beyond the ones I will use on my car, so I dont think I can help you out... Im REALLY sorry about that. These things are die cut around the script, and the script & Y-8 are separate - you have to line them up when applying the decals. Should be pretty straightforward. I had a local sticker shop make these out of vinyl, since the water transfer ones that I coould find always krinkled up. I mention all of this because I think I could get a sheet of these printed up by the shop for a reasonable price, so if enough people were interested, Id be willing to talk to them about it and see what it takes. Id only look to cover costs, no profit on them. thoughts? Dan, Ill drop the one spare set I found in the mail on monday. Again, very sorry for the delay.
|
|
By mctim64 - 16 Years Ago
|
|
Do you think you can post a picture of the decal, I'm just curious if they are the same as the ones I've been getting. Thanks
|
|
By rgrove - 16 Years Ago
|
mctim64 (2/1/2009)
Do you think you can post a picture of the decal, I'm just curious if they are the same as the ones I've been getting. Thanks I can try to, but they have a sheet over the top to align/protect until you install them, so it might be a while before I redo my valve covers. Im not sure how these could be the same as ones you have been using, since I had these made locally. They took one of the water transfer ones, scanned it, etc. and them printed/die cut them. Its important to note that these arent on one rectangular sheet of clear (like the ones that I used to be able to find). These are a die-cut script that doesnt have any background (clear or otherwise). The die cut is around the lettering/Y8 Logo, etc. Hard to explain, maybe Dan can post pics/comments once he gets them and installs them?
|
|
By mctim64 - 16 Years Ago
|
|
OK, I know what you are talking about now, I've had decals like that made before (not of the Y emblem but something else) I do however buy some that do not have the full rectangle background transfer that don't look too bad. 

|
|
By Dan - 16 Years Ago
|
|
Thanks! Look forward to getting them! Going to hit another round of parts gathering (when payday gets here ) and we should be REALLY close! I want to have everything on hand before we start assembling so once we get going we dont have to stop - picked up a vintage Speed Gems trans adaptor so now we know what direction we'll go with the trans. One of the students is milling out a set of header flanges, we are going to try and fab a set of lakes style headers. On the hunt for a cool vintage intake, but we can certainly use what we have till we find one, that wont hold us back. I'll for sure post pics/videos of the blue 292 on the test stand - Tim you were absolutely correct about the radiator being below the engine, that is going to present some challenges. I think we have it purged but wont know for sure till we get the engine up to operating temp. Thanks again for all the help!!
|
|
By Dan - 16 Years Ago
|
|
Ron- I got the decals, they are awesome, thanks! I'll post pics when I get them installed, may have to change the color of my valvecovers though, we'll see, thanks again!
|
|
By rgrove - 16 Years Ago
|
Dan (2/4/2009)
Ron- I got the decals, they are awesome, thanks! I'll post pics when I get them installed, may have to change the color of my valvecovers though, we'll see, thanks again! Fantastic! Glad to help even in a small way. Let me know how they go on; i havent installed mine yet!
|
|
By oldcarmark - 16 Years Ago
|
|
Hello Ron,They look great!These won't wrinkle like the water based ones?When I put the water ones on mine I had the (not so) bright idea to give the covers a spray of clearcoat.Had to start all over again.Clearcoat makes them lift and wrinkle.I have no idea what they cost you to make them but you might think about marketing them if they work so well.Regards,Mark
|
|
By rgrove - 16 Years Ago
|
|
oldcarmark (2/5/2009)
Hello Ron,They look great!These won't wrinkle like the water based ones?When I put the water ones on mine I had the (not so) bright idea to give the covers a spray of clearcoat.Had to start all over again.Clearcoat makes them lift and wrinkle.I have no idea what they cost you to make them but you might think about marketing them if they work so well.Regards,MarkThat is EXACTLY the problem I had and why i did this. Id love to get a run done of them and sell them; im just not sure about copyright stuff on this?
|