|
By charliemccraney - 16 Years Ago
|
Tonight, I decided to try a master cylinder with a smaller bore. The one I've been using is for a 1968 corvette with power brakes, 1 1/8" bore. The one I want to try is for the same vehicle with manual brakes, 1" bore. I have manual brakes.
Anyway, I got it installed, and the front brake circuit would not bleed. I tried the two person method - 1 handling the screw, the other handling the pedal. I also tried a vacuum pump. I also noticed that the master cylinder would not make a little fountain in the reservoir when the pedal is pressed.
Both cylinders allow the pedal to travel to the floor so they aren't bottoming out. The 1 1/8 cylinder might require 1/3 of the available pedal travel to stop the truck and so there should be plenty left for the 1" bore.
I think it's a bad master cylinder. What do y'all think? have manual brakes.
|
|
By Glen Henderson - 16 Years Ago
|
|
Did you fill and bleed the master cyl before you installed it?
|
|
By Hoosier Hurricane - 16 Years Ago
|
|
Charlie: Do you have a little bit of "free play" when the pedal is all the way up? If not, the actuating rod may be too long and not allowing the cylinder to back up far enough to take in fluid.
|
|
By charliemccraney - 16 Years Ago
|
|
Glen Henderson (5/1/2009)
Did you fill and bleed the master cyl before you installed it?
I don't think so. How do I do this?
Hoosier Hurricane (5/1/2009)
Charlie:
Do you have a little bit of "free play" when the pedal is all the way up? If not, the actuating rod may be too long and not allowing the cylinder to back up far enough to take in fluid.
There is some free play.
|
|
By Moz - 16 Years Ago
|
|
charlie i may have an answer for you if the master is second hand check the bottom piston is not stuck in the bore i have had this happen on master cylinders before usually the front wheels wont bleed & no fountain in the resevoir you cant feel it pressing on the brake pedal it will feel like both pistons are moving as the spring between the 2 pistons will still compress have also had it happen on a new master cylinder that had sat on the shelf for a while at the parts store & was bench bled.
|
|
By charliemccraney - 16 Years Ago
|
|
It's a remanufactured master cylinder. I was thinking about taking it apart to see if anything is apparent. I haven't taken one apart before. Are there any parts that like to jump out and dive into the black hole under the work bench?
|
|
By simplyconnected - 16 Years Ago
|
|
Glen Henderson (5/1/2009)
Did you fill and bleed the master cyl before you installed it? This is called "bench bleeding" and is VERY important, Charlie.Simply take the M/C to your bench and install plastic tubes (or old brake lines) from the brake line outlets back to the reservoir. Fill both sides at least half way, then pump the piston at least thirty times. You will see tiny air bubbles in the fluid, so the idea is to do this relatively slow. Keep pumping until the bubbles stop. The M/C has lots of nooks and crannies inside. Doing this on your car will require LOTS of brake fluid (because the tiny bubbles keep coming for many strokes). On your bench, return tubes recycle the fluid so there's less waste. You are smart to go down from 1-1/8" piston. That's a lot of area, and I never met a brake system that required so much volume. Reducing the bore to 1" will give your foot a 20% easier pedal. Reducing to 7/8" will ease the pedal by 40%! My '55 Customline came with a 7/8" M/C. It pushed four shoes without a power booster, just fine. If you keep up with your brake adjustments 7/8" is the way to go. Hope this helps. - Dave
|
|
By Moz - 16 Years Ago
|
|
not really once you remove the circlip the washer & first piston may pop out but they shouldnt goe flying under the bench. as its remanufactured it could be possible a cup is on the piston the wrong way ive had that happen as well you know put together at 4.45pm on a friday
|
|
By charliemccraney - 16 Years Ago
|
|
simplyconnected (5/1/2009)
Simply take the M/C to your bench and install plastic tubes (or old brake lines) from the brake line outlets back to the reservoir. Fill both sides at least half way,then pump the piston at least thirty times. You will see tiny air bubbles in the fluid, so the idea is to do this relatively slow. Keep pumping until the bubbles stop.
Hope this helps. - Dave
I've never heard of that. But if it's a good thing to do, then perhaps I should start doing it. Sounds like an excuse to make another tool. I haven't had problems the way I've been doing it - perhaps until now.
|
|
By simplyconnected - 16 Years Ago
|
|
Charlie, you can use old 3" brake line ends. Just bend them up, back into the reservoir (like a "C"). Some instructions make it clear to end the hose below the liquid surface, in case the brake fluid wants to suck back into the M/C. I find old brake line works better than clear plastic. When bending the line, metal tends to stay put. Plastic needs clips to hold it down. Here's what MBM includes for bench bleeding, with the purchase a M/C: 
It's a couple clear tubes with hard plastic tapered ends (you just shove them into your output holes). Here's another set: 
This kit has "exact fittings" but it's the same thing, two little plastic tubes.
Put the M/C in a vise and start working the piston in and out, like I said, about thirty times. When the bubbles stop, you're ready to mount it in your car. - Dave
|
|
By yehaabill - 16 Years Ago
|
|
Y-Guy Charlie: When you get it working,give us some feedback, if it helps. I've got a 1" bore(manual) in my '60 with 4-wheel disc and it stops o.k. but, the pedal is hard and takes a "good" push to stop it. I'm curious if your deal will help..... Thx Bill
|
|
By PF Arcand - 16 Years Ago
|
|
Charlie: Glen is correct. I bought a Master for an 80 Malibu some time ago. It came with bench bleeding instructions. If you take your rebuilt one apart, the guarantee if any, is gone! I don't remember exactly how I followed the bench bleeding up, but I managed to loosely connect the lines to it, with the resivour topped up, put a rag under it and while using the pedal to apply some pressure & with fluid at the connections, I closed them. I didn't even have to bleed the system after..
|
|
By simplyconnected - 16 Years Ago
|
|
Bench bleeding has very little to do with bleeding your system, it's just the beginning. If you don't bleed the system after bench bleeding the M/C, you WILL have air in your lines, guaranteed. You can bench bleed with the M/C installed, but it is much easier to level (and cleaner) when done on the bench. Regarding all this discussion; bench bleeding is easier to do, than to talk about it. Rebuild your M/C if you think it needs it, then bench bleed it. Same goes for new Master Cylinders. Here's a good web site explaining 'bench bleeding'. There isn't much to it: http://www.misterfixit.com/brakbld1.htm 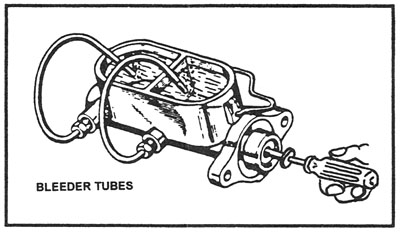
This is a method using old brake lines. Notice the tubes are below liquid level so air has only one way to escape. I use full strokes when bench bleeding.
|
|
By charliemccraney - 16 Years Ago
|
|
I'll give bench bleeding a whirl today.
|
|
By charliemccraney - 16 Years Ago
|
I got a chance to perform a bench bleed this evening. I did 30 strokes. Both reservoirs bubbled for about half. When it stopped bubbling, I could see the fluid rise in the reservoir as a result of the fluid being displaced by the piston. So I guess this means that it is working. I'm not able to try to install it tonight so I put the cap on and plugged the ports.
I didn't take it apart. It has a funky circlip and I don't think I will be able to get it out with the tools I have available without damaging the cylinder or myself.
I measured my pedal travel. It requires about 2 1/4" travel with the 1 1/8" bore cylinder. I have about 7 1/2" until the pedal hits the floor.
Am I correct thinking that my new pedal travel should be equal to current pedal travel times the area of the current piston divided by the area of the new piston? PTn = PTc ( Acp / Anp) and so it should require about 2 7/8" with the 1" piston.
Is it possible that the master cylinder is bottoming out even though the pedal goes all the way to the floor?
|
|
By simplyconnected - 16 Years Ago
|
|
Charlie, you are a very thorough man (and a good one). I told you 30 strokes because I wanted to make sure no bubbles were coming out when you were done. Bottom line: You can see the advantage in bench bleeding vs wasting fifteen strokes of brake fluid & bubbles through your brake lines. If you saw both sides bubbling, that proves both sides are working just fine (they work independent of each other). So, there's no need to disassemble. Seeing those bubbles is another advantage of bench bleeding. Your brake pedal calculations are good except for one thing. When your shoes or pads are adjusted correctly, your brake pedal will hardly move. The piston diameter won't mean much at all if the pistons hardly move. Your travel will be at the top of your pedal. When you get your M/C installed, bled, and you adjust your shoes, you'll see. - Dave
|
|
By charliemccraney - 16 Years Ago
|
|
simplyconnected (5/6/2009)
Your brake pedal calculations are good except for one thing. When your shoes or pads are adjusted correctly, your brake pedal will hardly move. The piston diameter won't mean much at all if the pistons hardly move. Your travel will be at the top of your pedal. When you get your M/C installed, bled, and you adjust your shoes,you'll see.
- Dave
I've never measured the pedal travel before but from the original master cylinder, to the replacement original master cylinder, to the Lincoln dual reservoir master cylinder, to the corvette master cylinder, through 4 wheel drums, and disc/drum, the pedal has felt the same. I even had the only shop I trust check out the drum brakes after I did them just to make sure I did everything right - it was my first time. I had shoes backwards and adjusters on the wrong side. Anyway, when I got it back the pedal felt the same. So I have to believe that 2 1/4 is is in the ball park for what it needs. I can lock the front wheels and it will not pull. I can adjust my proportioning valve so that I can lock all 4 wheels and it does not pull so I have to believe everything is adjusted and functioning properly. Assuming a 4:1 pedal ratio, it works out to about 9/16" at the mc. Maybe it's semantics but I've never driven a car where the brake pedal hardly moved.
Oh, and yes I see the benefits of bench bleeding. I'm going to make a tool for it, though. I don't like what the vise did to my fresh paint on the mc.
57 Ford Kustom (5/7/2009) When you take your master cyl. off , or find someone that has the stock one and measure the stroke on it and than adjust your pedal height for the new one. T  M
The new one did have a little more play before the push rod actually pushed on the piston. It may have been about 1/16" difference at the cylinder. I didn't adjust it because I wanted to make sure it would work before changing the setting. Perhaps I should have adjusted it.
|
|
By simplyconnected - 16 Years Ago
|
|
charliemccraney (5/7/2009)
...I can adjust my proportioning valve so that I can lock all 4 wheels and it does not pull so I have to believe everything is adjusted and functioning properly. ...I've never driven a car where the brake pedal hardly moved.
Oh, and yes I see the benefits of bench bleeding. I'm going to make a tool for it, though. I don't like what the vise did to my fresh paint on the mc.
The new one did have a little more play before the push rod actually pushed on the piston. It may have been about 1/16" difference at the cylinder. I didn't adjust it because I wanted to make sure it would work before changing the setting. Perhaps I should have adjusted it.Charlie, sounds like your brakes are working just fine. You should fine-tune your system by adjusting the M/C rod, just so it jiggles. That will ensure a full retract on the M/C. Also, pick up your tires and adjust your shoes. I don't know how new they are, or if you have self-adjusters. Spinning your wheel by hand, the shoes exert a slight drag. Adjust all four drum brakes to this "feel". They should never pull to one side. As new brakes seat, they go out of adjustment fast because the arc of the shoe is conforming to the arc of your drum. Before too long, they will mate perfectly and you will gain more surface area on each brake. Disk brakes don't have an arc, so this only applies to drum brakes. Disk brakes don't retract either, they relax. Because they don't retract, there is no brake adjustment. Charlie, take pictures! Get a cheap digital camera and store your before/after pics on your computer. I take 10 pictures of everything. The ones I don't like, I delete. So many times, I wished I had taken more pictures at different angles. Sometimes I refer to a picture for a completely different reason than I took the picture for. The moment it takes to snap a photo will save you from redoing backwards Pri/Sec shoes, or adjusters. We've all been there and done that. I'm glad you got things going again. To tell the truth, I never use a vise for bench bleeding. I do it on my drill press table, and back up the M/C against the back post with a 2X4 in between. I use a long phillips screwdriver, pushing on it with my belt buckle. My hands are free the whole time. - Dave
|
|
By charliemccraney - 16 Years Ago
|
I take lots of pictures now. The backwards shoes and adjusters on the wrong side was at least 8 years ago. I have much more experience now!
I'll try reinstalling the cylinder this weekend. Hopefully it was just a fluke. Otherwise, I guess I'll stay with the 1 1/8.
|
|
By simplyconnected - 16 Years Ago
|
|
We all start out the same. I can remember my first brake job. I had NO IDEA one shoe was longer than the other. It was a complete surprise when I discovered I put two secondaries on one wheel, and the primaries on the other! I couldn't figure why the car pulled so bad with brand-new Bendix premium shoes. Ever since then, I paid closer attention to detail. I had a '64 Tempest that was due for its first set of new shoes. I noticed the right-rear shoe was perfect, just like it came out of the box, but slightly rusty metal. I discovered the cylinder had NO hydraulic hole from the inlet to the cylinder bore. Back then, I bought a new cylinder. Today, I would drill a simple hole. Funny, I did a lot of brakes since then, and 'lost sight of' most of them. A relative will remind me of when I did their brakes while they were in town for a visit (usually on a car that's long gone)... Charlie, use that 1" bore M/C. It's new, and it should work perfectly. Your leg will thank you for using at least 20% less pressure to stop your truck. My '55 Customline came with a 7/8"-bore manual M/C for 11" X 2-1/2" shoes.
|
|
By charliemccraney - 16 Years Ago
|
2nd try is a charm. I have successfully installed the 1" bore cylinder. I guess there was just some air in there that wsn't getting out the first go round. It's like a night and day difference. It's both good and bad. It stops better which means I'm going to push it harder. I wish I had done this sooner! That's what I get for listening to the people who supplied the disc brakes!
Here is a picture of the simple holding fixture I made for bench bleeding.
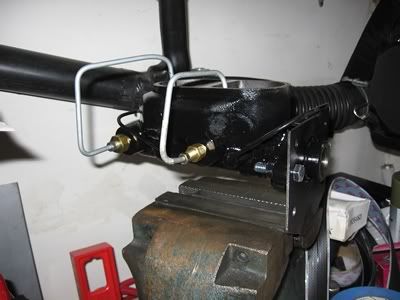
It clamps into a vice and the cylinder mounts almost as it would in the vehicle. I've ovaled the holes so that most Chevy and Ford 2 bolt cylinders should fit. I think Ford 4 bolts may work as well. It works great as a fixture for painting. Just flip it to the other side. I have some longer bolts with 1 1/2" spacers so that the back and bottom of the cylinder can be painted easily. It's a piece of 12 gauge steel welded to a piece of 3/4" square tubing with a .065" wall. I had made patterns for some gussets but it doesn't seem to need it.
Bill,
I don't know if this particular cylinder will help you but you should try a 7/8" bore to see what it does. It will require more pedal travel.
|