|
By Red55Bird - 13 Years Ago
|
Hello
Newbie here.
So, hoping some of the Y-Block folks can help me out......before I go batty  . Working on a 55 Thunderbird that has a 272 in it. This is not the original engine. It's my Dad's, owned since 63 and has been in storage in our basement since 1969 November! Engine has probably less than 5K miles on it and obviously did run. . Working on a 55 Thunderbird that has a 272 in it. This is not the original engine. It's my Dad's, owned since 63 and has been in storage in our basement since 1969 November! Engine has probably less than 5K miles on it and obviously did run.
Anyway, Saturday nite after months and months and many hours we set out to fire it. After pre oiling rockers we cranked it and all is well. Due to a faulty NEW fuel pump.......needless to say we were unable to actually start it. However, what is driving me NUTS is crank rotation. On these engines, standing at the FRONT of the vehicle looking at the crank pulley........which way is it supposed to rotate?? Dug through our manuals and couldn't find much other than distributor rotation (viewed from top) should rotate counter clockwise of which it does. However, looking at front of engine.........it is rotating clockwise as you crank. Hoping someone can 100% tell me, "yep.......car/truck y-block crank rotation is clockwise"  : :
Look very forward to some reassuring words.
Thank you! BILL
|
|
By GREENBIRD56 - 13 Years Ago
|
|
Yep - that's the right way...clockwise seen from the front. Test the fuel pump, installed on the engine with a hose dropped right straight down into a gas can for a supply. The line to the tank could be badly rusted inside (often is) - the tank inlet blocked - all sorts of things interfere with the pump suction of fuel.
|
|
By Red55Bird - 13 Years Ago
|
Whew, thank you. Now I can sleep tonite concerning engine rotation. Far as the fuel pump, we're getting fuel to the pump. Problem is what I believe to be a faulty pump. It's an Airtex I snagged from O'Reilly's and seems to be operating backwards. Meaning, the line in side of the pump is "pushing" and the line out is creating a vacuum. Hence, threw the original pump in it and poooooof........it squirts fuel where it's supposed to  . So, gonna order a pump from Mac's Auto Parts online, have had good luck with them. Also ordering a new fuel tank as well. We did have the original hot tanked, cleaned and all that but just don't trust it and going to replace. That way the fuel system will be all fresh. The fuel lines have been flushed out and are running clean. So hopefully we'll have all our pieces by next weekend and this Bird will move again. Thanks for the help, appreciate it very much! . So, gonna order a pump from Mac's Auto Parts online, have had good luck with them. Also ordering a new fuel tank as well. We did have the original hot tanked, cleaned and all that but just don't trust it and going to replace. That way the fuel system will be all fresh. The fuel lines have been flushed out and are running clean. So hopefully we'll have all our pieces by next weekend and this Bird will move again. Thanks for the help, appreciate it very much!
|
|
By 62galxe - 13 Years Ago
|
|
When I put a pump on my 292 I discovered that the replacement pumps ports were oppisite of the original. Dont ask how long it took me to figure it out.
|
|
By slumlord444 - 13 Years Ago
|
|
If the inlet and outlet are switched on the new pump just switch the lines to match.
|
|
By oldcarmark - 13 Years Ago
|
|
Has the car and engine been in storage since 69 or just the engine?
|
|
By Red55Bird - 13 Years Ago
|
Yes, thought about switching the lines on the pump but rather not have to start from scratch bending pretty lines . Just ordered one from Mac's this evening. If it acts like the O'Reilly's pump, then I'll resort to bending new lines to match. Hopefully it's a plug in play though from Mac's.
In reply to the car being in storage. Yes, entire car has been in a dry basement. People can't believe we have cars in our basement, guess we're weird motor heads. Anyway, it's quite the piece of history. Last licensed in 69 and still has that year plate on it. Just got my wheels and tires this weekend, really changed the look of the car. We went with black steelies, 15x6 in back and 15x5 up front. Front tires are 215/70 BFG T/A's and rears are 235/70 BFG T/A's. Going to run a fresh set of red center dog dish caps. Will have to get some pics posted up eventually of the car.
Thanks for the help folks, appreciate. Any other y-block tips would be great. Am trying to figure out which Pertronix ignition to get. Ordered from Summit and apparently picked the wrong one. Car is a 12V system too. Dunno, just wondering which one we need.
|
|
By GREENBIRD56 - 13 Years Ago
|
|
Are you using a "Load-O-Matic" distributor out of the original '55 motor? Along with the matching carburetor? If so, you probably still have a few bridges to cross - Just give us a better Idea of what the total engine equipment is and we'll do a better job of getting you the info you need.
|
|
By 54mercury312 - 13 Years Ago
|
|
All I can say is wow!!!! Sounds nice!!! 43 years of preservation. Just a thought before you take it out you might want to check your rear axle & (if manual), the trans fluid to make sure they are not dry, if you have`nt already done that. Also, You mentioned it is now 12 volt, (not sure about the T-birds), but the 55`s were 6 volt positive ground originally. You may want to check if that has a bearing on your petronex ignition. Just in time for summer..... Good Luck 54 Merc 312 (also a newby)
|
|
By Red55Bird - 13 Years Ago
|
Hi Guys
More info on engine, trans, electrical, etc.
Distributor I am unsure of, I believe it is a later model. All I know is it has vacuum advance.
Intake is a 57 and we put a new Holley 600cfm on it. Had to make an adaptor for the stock air cleaner to work annnnnnnd modify the air cleaner base itself. Just had to remove the part where the cork part went. Apparently with the 57 intake and the big Holley, the hood didn't wanna shut 
Other details. Had brake booster rebuilt last month. I did ALL new brakes which was shoes, hardware, springs, wheel cylinders, hoses and rebuilt the master cylinder. All hardlines have been flushed and verified to run clean. New front wheel bearings and seals. New axle bearings and seals and pinion seal. Rearend drained, cleaned, flushed and fresh juice installed. Rear gears are 4.10's sooooooooo we'll probably be going to a steeper gear set New water pump and radiator. Power steering pump "appears" to be ok but won't know until engine is running. Then I fear there might be a leaking pump, lines/hoses and or cylinders to deal with. Replaced all engine mounts. One other terrifying thought is rear main seal issues. Car sat for 43 years, soooooooo I've read enough horror stories about the "rope seals" on these engines. If indeed it leaks, wonder how much fun it would be to replace in the car or if it's even possible. Exhaust will be the next engine related pieces. It has headpipes and mufflers on it but no tailpipe pieces. Hoping I can just order up the 4 pieces for the tailpipes and hardware/hangers and be done with that portion. Transmission is a Borg Warner T10 4 speed, that my Dad bought from the local Ford dealer circa 1964! Went through the trans and it's brand new again. Pressure plate was fine, got a new disc, throw out and pilot bearing and all is installed and goes through the gears pretty nicely.
Electrical. It was a partial 12V system in the 60's. My Dad can't quite remember how he did it though. However it does have a 12V regulator and gen on it and 12V starter. Seems to have 12V headlights in it but we of course are going to go through and check that and swap all interior lighting to 12V as well. Far as ignition, took the points all out and went to install the Pertronix from Summit to learn it was incorrect. So, put all the standard stuff back in as well as new plug wires. When cranking it, it'll shoot an arc (from coil wire to coil) probably .250 or more back into the coil and you can hear the arc! So I think we'll be ok with points for now. Most engine bay wiring has to be replaced or repaired. Have a headlight harness coming from Larry's, the one that goes between headlights, horn and regulator. Noticed also need the actual headlight harness itself as well, from the junction block to the headlight. Interior wiring is ok, still flexible and safe but there will be some hours involved in straightening that up and double checking it.
Will be replacing the entire hardtop weatherstripping (ugh). Door gaskets, gasket for rear window in hardtop, trunk seal, the tail light gaskets, door handle and lock gaskets, etc etc. BIG money there it looks like to get it all sealed up with fresh gaskets and weatherstripping. Other exterior pieces are reinstalling the "hash" marks, V8 emblems and Thunderbird script. In 64 my Dad redid the body and painted it. However, removed all emblems and filled mounting holes. Gonna be kinda fun to dimensionally locate where emblems go. Thunderbird script should be fine, can see from inside trunk where those holes were. Hash marks and V8 emblems, might be able to crawl up in the front fenderwell and find those from the inside. Car also needs an outside mirror, not quite sure how to locate that! Other exciting parts will be getting the wipers working, budget too tight for the electric conversion wipers
Having a lot of fun. It's a family project with my Dad, my amazing wife and 4 year old Son. We're all having a blast and my wife amazes me each marathon weekend we put in on the car. This past Saturday was a 9am start and we clocked out at 2am Sunday morning. Couple weekends ago we did a 9am start and quit at 430am Sunday morning! FUN!
|
|
By GREENBIRD56 - 13 Years Ago
|
|
Thanx for the run down - sounds like you are having some fun there! Figuring out which distributor is in there will solve the "which Pertronix do I need" question...the older vacuum advance distributor - with the cap lifted - will show you two springs prominent on top of the point plate. And the base plate of the points unit will be "straight". Later versions with mechanical advance (hidden down under the point plate) will have a "curved" points base. 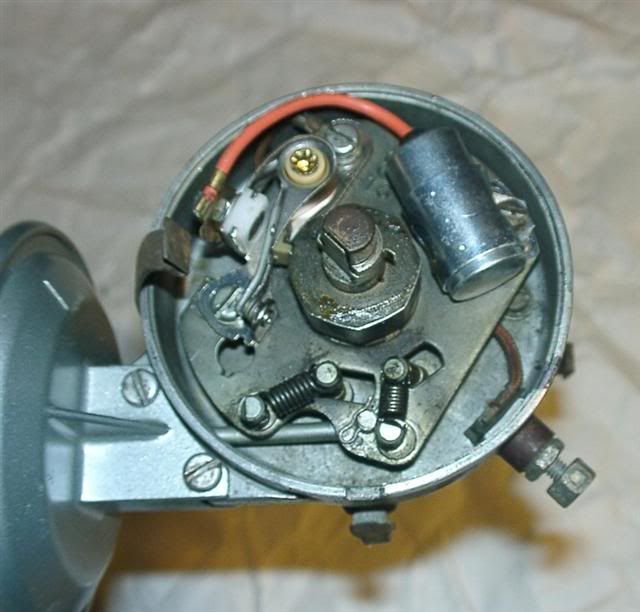
This is the older "Load-O-Matic" distributor - it requires a "venturi vacuum" signal not avaiable from the Holley 600.
|
|
By oldcarmark - 13 Years Ago
|
|
You will need the later distributor with both vacuum and mechanical advance-post 57 style to work with that newer style carb and intake.As mentioned if you can see springs on top of the advance plate you have original vacuum ONLY advance style which wont work with that carb set up.
|
|
By bird55 - 13 Years Ago
|
Glad to hear you and the family are getting the Bird up and running. We'd all like to see pictures of the car and engine setup when you get to it.
On the subject of the mech fuel pump, FYI, on a bird with power steering, it's easy to get the pump on and bolted up and actually have the actuating arm NOT seated on the concentric cam properly. And the the pump either won't work right and appear to be faulty. I know this from experiance! It must go straight in to line up, and thats not so easy with PS bracketry in that area and the engine in the car.
Is the rear end set up original 55 spicer or is it a later 9"?
|
|
By Red55Bird - 13 Years Ago
|
Rearend is the original unit and has 4.10's in it. It actually came out of a 55 wagon. In the 60's it was a drag car with a 421 Pontiac in it and had a Chevy rearend in it. In the late 60's my Dad decided was time to put it back original and picked up a 55 wagon, of which he wishes he kept. It was a 2dr wagon!! Anyway, we're likely going to have to put some steeper gears in it so it's an easier cruiser. Maybe 3.08's or something in that range.
Meanwhile, we've got a new tank coming, fuel pump and some other goodies. Hope to get it running THIS weekend possibly. Then move onward. My only fear is this puddle of oil my Wife noticed last weekend under the car. Without going under for a closer look, I FEAR it's a rear seal. If that is the case, how challenging is that to replace with the engine IN the car? Can it be done? There isn't time to pull the engine to do this as we have a deadline. The big idea is to have it ready late this month or first week of June. We want to drive it to Gulfport Missippi (from St.Louis). My cousin is getting married and we thought it would be so cool to take The Bird for a roadtrip. If in fact it's got a bum rear seal, that will likely put the stops to the road trip idea . Tried searching around here on rear seal replacement IN car but only came up with a few posts saying people had done it. No real play by play on how this is accomplished. We'll see but hopefully someone can enlighten me
Aside from that, the only other scary unknown is the power steering system. I went through the pump and cleaned it and checked over everything else. However, again........my Wife noticed a leak at the bottom of the power steering pump. Soooooooo, I can almost bet ya once it's running the pump is gonna spew not to mention the lines and all that will be questionable. They were replaced years ago but years ago means like maybe 1965! We'll see.
Electrical will be the last exciting part. The Bird's life was a good one but underdash wiring has been modified, not hacked, just rearranged we'll say. Guess we'll start from scratch and put everything back where it's supposed to be and double check it all. That and replacing all the bulbs with 12V units. Interior wiring on back to the tail lights is fine. With the battery in it the other weekend, headlights worked, tail lights (less brake lights due to dead switch) some interior/dash lights, blower motor, etc. Engine bay is crispy from the big fire breathing engine (s) it had when it was a drag car. Will have to replace some looms and repair others for sure.
Should be updating later this weekend.
Thanks for all the help thus far. Gotta get ya'll some pics
|
|
By bird55 - 13 Years Ago
|
Per the rear main seal, YES it can be done in the car. You may have to jack up the engine slightly (remove the front bolt mount, and loosen the steady rests, rotate the crank to remove the oil pan. other than that it's rear main seal replacement as per usual. try to get the neoprene seal in mho. Don't be surprised if you still end up without it being bone dry.
As far as the PS goes, the pump may leak BUT most likely hoses or fittings are more common culprits AND especially the PS CONTROL valve and ram cylinder. All capable of having leaks! unfortunately. But they can be serviced and repaired. Just keep in mind it's old parts and won't probably ever be bone dry. At least my stuff isn't. Good luck and still waiting to see some pics!
|
|
By 54mercury312 - 13 Years Ago
|
|
I have heard these old rope rear main seals may swell to some degee after a little run time, if that is where the leak is. 54 Merc 312
|
|
By bird55 - 13 Years Ago
|
one more thing, don't let the rear seal leaking keep you from driving it unless its pouring out of course. do some test drives. These cars need to be driven to stay loosened up. Sure it's messy on the floor and such but you can always add oil & ps fluid cheaper and easier than repairing the seals for now. You can get that done in due time.
You may have more to sort out than you realize before the long trip (approx 1300 miles), so take it on some 50 milers around home to check and sort things out.
|
|
By Red55Bird - 13 Years Ago
|
So, digging around on the net and found the rear seal kit. Is this the one I'd need, and is it the neoprene? Can't find that info anywhere.
BS6141 is the Fel Pro part number.
Meanwhile, the fuel tank showed up as did the one headlight harness from Larry's. The Mac's goodies will be here Monday which will have the new fuel pump along with some other pieces. Hoping Sunday afternoon to get the tank swapped out, fuel pump off and ready for the new one and tinker with some other needed items. Haven't suggested yet to my Dad that the rear seal maaaaaaaay be leaking . Just freaks me out in only cranking the engine multiple times, it squirted.......not evening running! . We shall see.
|
|
By oldcarmark - 13 Years Ago
|
|
The consensus on the site is the best rear main seal to use is made by "Best Gaskets".Seems to be the most successful replacement seal.There are several topics on this if you use the search box at top of any page.Apparently Best is also supplying a graphite type similar to the original rope type.Talking to a seller at a swap meet last weekend.Says he spoke to someone at Best who claims beter sucess with this new graphite even over their neoprene one.Anyone else familiar with this raphite type seal?
|
|
By GREENBIRD56 - 13 Years Ago
|
|
Redbird - just a side conversation here, maybe you have some blowby crankcase pressure sneaking into this. Does the engine have the old style crankcase beathers installed? The more modern arrangement with the PCV valve and crankcase air entry at the front fill tube tends to work a bit better at keeping down the bleeding.
|
|
By Red55Bird - 13 Years Ago
|
GreenBird:
Yep, we've got the blow by or road tube on this engine. To be exact, the leak I am worried about looks to be hitting the floor right where it would run down from a rear seal. Sunday I am planning on getting in a few hours on The Bird. Will be the first thing I crawl under and check out.
Other thing I thought of today. All the trim pieces were removed and holes were filled. I think I can locate the script on the quarters through the trunk. Hash marks, maybe can see up behind the fender in the wheelhouse. However, is there something online or does anyone have a manual (body repair maybe) for The Birds? I swore there were manuals that had drawings and dimensions as to where emblems and stuff was mounted.
One more thing that needs to be done is exhaust. It does have headpipes and mufflers on it. Need from mufflers on back. Would you guys suggest purchasing online? Have talked to some E-Bay sellers that do the 55-57 exhaust and they shot me a fair price. Also thought about hitting one of the local exhaust shops but fear they won't be too very excited to build exhaust for an Old Bird .
|
|
By bird55 - 13 Years Ago
|
Red55Bird (5/12/2012)
GreenBird: Other thing I thought of today. All the trim pieces were removed and holes were filled. I think I can locate the script on the quarters through the trunk. Hash marks, maybe can see up behind the fender in the wheelhouse. However, is there something online or does anyone have a manual (body repair maybe) for The Birds? I swore there were manuals that had drawings and dimensions as to where emblems and stuff was mounted. One more thing that needs to be done is exhaust. It does have headpipes and mufflers on it. Need from mufflers on back. Would you guys suggest purchasing online? Have talked to some E-Bay sellers that do the 55-57 exhaust and they shot me a fair price. Also thought about hitting one of the local exhaust shops but fear they won't be too very excited to build exhaust for an Old Bird .
you may be able to sneak up on the front fender emblem locations by checking with your hands and a flashlight. I bet you can see the the location if you check.
I've both ordered original pipes and had a local shop do the repair and or bend new ones. The shop did fine, muffler work is one of those things I prefer to job out. The older I get the longer that list is getting 
|
|
By Red55Bird - 13 Years Ago
|
Greetings.
Update. As of 5.16.12 at 10pm...........the little y-block is alive. New tank is in and decided to redo the fuel lines to work with the backwards fuel pump! Silly engine has been sitting for 43 years and fired right up and purrs perfectly. Sounds very good for a small displacement engine, responsive, quiet valvetrain, no smoking, etc. It actually likes the new Holley and all vacuum items are working such as vacuum advance and the brake booster so that was a relief. We'll actually tune it this weekend, timing light and all that good stuff. Turns out, Dad remembers NOW that he never actually drove it with this engine so it's brand new! Anyway, planning on a marathon this weekend and finish up engine and driveline related stuff. Straighten up the engine bay wiring, etc. etc. and be done hopefully with that part of the project.
Next will be ordering and getting the exhaust together, LOTS of weatherstrip replacement and the oh so fun job of sorting out electrical stuff under the dash and part of the engine bay. Which leads me to this question........ WHERE is the flasher "can" for the turn signals???? None of our manuals tell me anything. Also noted, the leak I feared was the rear crank seal has seemed to quit now that the engine has run! Praying it stays dry, or dry enough to not worry about right now. Tonite gonna try to sit down and make the HUGE shopping list for the final run of parts ordering for now. This would be exhaust, weatherstrip/gaskets, carpet, kick panels, p/s rebuild kit, new "hash" pieces and hardware, hubcaps and some other odds and ends. Gonna be an expensive order I am thinking! Other fun part I am dreading is the wiper system! Not quite sure how it all works and certainly cannot afford the electric conversion package for the wipers right now. Some of the vacuum pieces are left under the dash for the wipers and I believe one of our manuals shows how it all goes together and is to work.
Saturday will be a shake down run up and down the street a few times. Get it warmed up and legs stretched then dump the oil and get fresh stuff in it and add the spin on filter adapter. Once we're satisfied with it's running and driving, off to electrical fun under the dash. Dad is rebuilding the door hinges (star wheel portion) with new bushings and other custom pieces. Wife and I will tackle electrical while Dad is getting door parts ready to go back together. Also have some floor tunnel pieces to fab up. Dad (gasp) hacked the tunnel years ago to make access shift linkage on the 4 speed easier. Well, now he is freakin out and wants to redo it all so it's factory looking. That's his project, I don't even know where to start there to make a new tunnel cover! Also have to make some custom pieces to secure the battery safely. Went with a group 56 like I've read online (Gil's garage) suggested. Not too pleased with how it fits but with the right parts, it'll be ok.
Anywho, if I get the green light to order parts......will do that this evening which would get them hear middle of next week. Then we've got the holiday weekend to play. Then once it's pretty much complete, have to get it inspected and Pray it passes. Then, appraised in order to get insurance, then we can get plates on it and it'll be legal!!! LOTS to do and not much time to do so. I may have to get me some happy pills to keep me leveled out
I apologize for lack of getting pics or anything up for you guys. I really need to sit down and put some together and get them posted. Wife shot a 30 sec video of the engine firing up for the first time as well as me messing around seeing if the horns work. They DO and MAN are they loud! . We plan without a doubt to drive it this weekend. We have a long dead end street so we can safely putt around and check everything out like brakes, trans, clutch adjustment, steering, etc. etc. Wife will be shooting video you can count on that .
|
|
By Red55Bird - 13 Years Ago
|
|
Ah, one other thing. How is the majority of the weatherstripping attached? Adhesive? Haven't pulled any off yet so didn't know. Trunk appears to be "glued" in place. Am sure someone can shed some light on the subject.
|
|
By pegleg - 13 Years Ago
|
|
Should be glued in place. You are having too much fun, congrats
|
|
By oldcarmark - 13 Years Ago
|
|
You must be pinching yourself! 43 years and it fires right up.Cant keep a Y-Block down!
|
|
By Red55Bird - 13 Years Ago
|
Dunno who was more excited when the engine fired. Me, my Dad or my wife that jumped about a foot off the ground! Was SO cool to hear fire off within a half a revolution after all these years.
Oh yippee, glued in place weatherstripping. Gonna need lots O tubes of monkey snot I guess. You guys use 3M yellow weatherstrip adhesive?
Flasher.............where might it be in a 55 Bird?? Turn signals no worky, found new flasher laying in the trunk. Pretty sure it doesn't go back there . Guessing it would be somewhere under the dash kinda hanging under there or clipped maybe?
|
|
By pegleg - 13 Years Ago
|
|
If it's like the car it's on the back of the dashboard.
|
|
By stlroken - 13 Years Ago
|
|
Red Sounds like your having a ball.....I use the 3M-yellow adhesive, works good and is available about anywhere. Isn't it great to have the spouse involved..it makes it much easier working on the cars...and a bonus with your dad. Keep up the good work, sounds like it'll be ready before you know it. Jim
|
|
By bird55 - 13 Years Ago
|
Yes back of the dash is a clip next to the steering column, pass side, ((maybe) could be the other side I'd have to look again.
IF you have all you claim to do under that dash with wiring and tunnel and such-Here's what I recommend. It is a WAY easier on you to pull the seat out and do your work under the dash! Makes it super easy compared to with the seat in. It may not seem like it but, it's worth it to pull out the seat first. Your neck and back will thank you for it, besides you got to do the tunnel right?
Still need those pics!
|
|
By bird55 - 13 Years Ago
|
|
I use use the black 3M adhesive as it doesn't show up as much. Read the directions! it works! skim coat on the rubber, a trail on the the metal, let it skim over and stick and done. Make sure you got it where you want it!
|
|
By Red55Bird - 13 Years Ago
|
Alrighty, update for this weekend.
Worked 9am to midnite Saturday. Got the holes for the emblems located and drilled and ready for fresh ones. MAN was that a terrifying job. Paint is from 1964 and is nice considering age. Well, laying out for all the hole locations, etc. then drilling. Holy crap was I a nervous wreck. Wife was good moral support but nervous as well. "Don't mess up the paint honey". Uh huh.......as I am sweating bullets and focusing. Anywho, that's all done and turned out quite nice. Next we tackled making fresh new fuel lines and getting those all plumbed. Wifey got the valve covers cleaned, and gaskets mounted whilst I was putting the correct rocker studs in for the valve covers. Got the new headlight, horn, horn relay, regulator and generator harness all laced in and installed. Apparently got something backwards because with parking lights on, I get a parking light on one side and headlight on the other. Pull the headlight switch out for headlights and the combo swaps. Soooooo, either way I've got something goofy. Managed to get the horn wire laced through the column as well. Boy was THAT fun lemme tell ya. Dad ended up taking over and accomplished the task. Got the brake light switch installed and brake lights still don't work but haven't checked bulbs yet. The tail lights do work but no brake lights, wondering if I got dead bulbs back there, the secondary element? Threw the radiator in and got hoses plumbed and installed, fan on and filled radiator.
So, 930pm Saturday nite we fire it up and let it run and get up to temp in the garage. Bought a triple gauge set and just plumbed in the temp to watch that. Has a 160 t-stat in it and it apparently works. Problem is that has my Dad and I a bit freaked out, thermostat open and bringing rpm up..........NO cross flow in radiator. Meaning, the water isn't moving/circulating. Pulled the water neck and check t-stat and it's working. Opened the block drain valves on the side of the block and they both stream water fine. Dunno what's up but it's got us a tad worried. However, car ran for probably 20-30 minutes and it never got hotter than 170 degrees. Any ideas would be great as to why we can't see water "cross flowing" in the radiator.
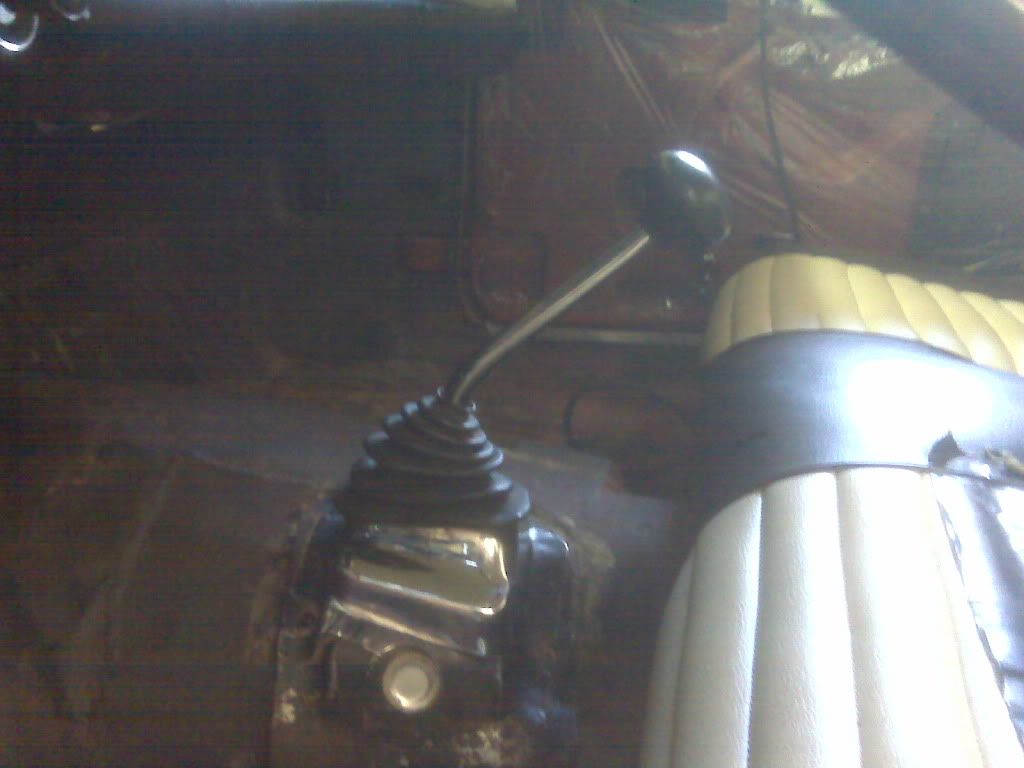
Anyway, 10pm we decide to see if the car will move. Idled out of the garage and made two trips up and down the driveway. Never got out of 1st gear of course but reverse works . Backing the car up the 2nd trip, push clutch in and hmmmmmmmm, car still moving! I instantly shut the engine off and there we sit, car stuck in reverse. Seems the throw out either is incorrect or faulty. Soooooooooo, with the car idling so we had power steering, wife steered while Dad and I pushed the limping Bird back in the shop to get under it. Not quite sure what is going on but seems like may have an incorrect throw out bearing! Ugh, so that means the trans gets to come out. Well...........it doesn't exactly come out in a hurry. It has to be unbolted from the bellhousing and literally shoved up through the floor of the car into the cabin! Am NOT looking forward to that job. Ugh. We shall see.
On another note, rear seal IS leaking but it appears just the side seals are puking oil. I got the Fel Pro kit so may just bite it while we're under there and do that job. Just will do bottom portion of seal and the side seals I think. Engine is coming out this winter to be replaced with something a bit more interesting . Either way, the car does drive and feels pretty good. Brakes feel nice, booster is working great too. Power steering came back to life and politely decided to puke at I think every fitting, hose, crimp, etc. etc. Not bad but certainly will require attention!
Far as working under the dash, no worries. Seat has been out since we put the trans in initially. My "seat" is a wheel with big layers of bubble wrap on it. Seat has to be out in order to shoe horn the tranny in the car. Soooooooooo, electrical fun will be alright. We're gonna take the hardtop off too so I can stretch out on my back and get my feet up on the deck I think too while working under dash. Has to come off anyway to do the weatherstrip kit. Kinda have to change direction and plans again now that the pressure plate or throw out bearing s mad at us. 
All in all it was a productive weekend I suppose. Got a lot done but feels like we're going back in time now again! By the looks/feel of it we probably have another 2 weekends of super labor intensive days between the trans issue and the rear main leak. No big deal I suppose. Learned Friday..........I am not allowed to take vacation during busy summer months. Sooooooooo, we've aborted the Missippi trip idea. Still going forward and a good pace though on the project and plan to get it legal, safe and on the road in June.
Thanks for all the help and encouragement here! Very helpful and learning more each 14 hour day spent on the car. . Gonna try and work on pics tonite, get a few up for ya'll.
|
|
By pegleg - 13 Years Ago
|
|
Two steps forward and one back is normal. When it's one forward and three back that's depressing!
|
|
By Red55Bird - 13 Years Ago
|
Ok, finally sat down and got some pics uploaded to my server. Nothing special and nothing too very recent. Car looks a tad different now, expecially with some fresh BFG Radial T/A's stuffed under it. I need to get a pic of it once we get the emblems installed and fresh new red center hubcaps. Tire/wheel combo turned out nice, took me awhile to decide. After LOTS of measuring and sleepless nites I decided. It's got 15x5 wheels up front, 15x6's out back. Front tires are 215/70-15 BFG T/A's and rears are 235/70-15 BFG T/A's. Thought we might have to lower the front a bit but the ride height is perfect. Rear will have to be dropped about .500 to .750 with some alum blocks I'll make. Not gonna be a low rider but the very top of the tires will juuuuuuuuust be up in the fenders. Front tires clear fine so no worries.
Anyway, here are the pics I managed to find. The first few are from the first day since 1969 it saw daylight. . Very last picture is how the car was put together in 1964 Rest are random I guess you could say. Didn't have any engine bay pics and no interior. Did but have no clue which phone, laptop, desk top or flashdrive they ended up on Will without a doubt get pics up of it in the coming weeks at it's present stage. Onto the pics.


|
|
By Ted - 13 Years Ago
|
|
Thanks for the pictures. By all means keep ‘em coming.
|
|
By rick55 - 13 Years Ago
|
Red55Bird you ask why you can't see water flow in your radiator. Some of these rads have a baffle plate which isolates the top of the rad header tank from the bottom with a small hole in the centre to allow water to flow through to fill the cooling system. If you car rad has this baffle you will probably not see water flowing. With the cap off if you stick your finger in the rad you should see or feel this baffle. Don't do this with the water hot.
Regards
|
|
By ejstith - 13 Years Ago
|
|
Like someone said before, I'd take it to a custom muffler shop for the exhaust. What do you mean you are going to put "a more interesting motor in it"? Nice paint for being stored that long.
|
|
By Red55Bird - 13 Years Ago
|
Interesting info on the radiator flow. We'll check it out. I kinda was wondering because it was cooling ok, water in radiator was cool........thermostat opened and water in radiator got hot. So, figured all was well.
Far as a my reference to a "more interesting engine" goes. My Dad wants to build a stroker out of our 292 we have. I kinda wanna do a 347 Stroker or dream engine would be a 406 Ford. Either way, it's gonna get more ponies and noise
Exhaust, I ordered up the 4 tail pipe pieces from Larry's. Car has new headpipes and "mufflers" on it. The mufflers are actually resonators off a 421 Pontiac. Sound pretty nice, not too annoying, not to cheesy. They currently exit under the car like it did when it had the 421 Pontiac in it. I think it'll sound pretty good with full exhaust. Amazing this little weenie motor sounds pretty stout.
Well, far as the clutch issue. We're really leaning towards a bum throw out bearing of which was new. One of my theories is the pressure plate went "home" once it got some heat in it and everything changed. I extended the clutch rod with adding a lugnut as a spacer behind it late Saturday nite. Wife pushing clutch in/out I could spin the clutch disc when disengaged, and it was engaging solid. Dunno, trans has to come out and I am not looking forward to it. It's quite the acrobatic feat.
|
|
By charliemccraney - 13 Years Ago
|
|
Red55Bird (5/21/2012)
I kinda wanna do a 347 Stroker That's well within the limitiations of a Y
|
|
By ejstith - 13 Years Ago
|
|
Glad to hear your "improvement" was a Y-block. Normally it's stick a late model Ford (or heaven forbid a scrub) motor in it. That motor & that Bird will be one fine piece !!!! Oh, & to find rotation just look at the fan blades & see which way they would have to turn to suck air through the radiator ...
|
|
By Red55Bird - 13 Years Ago
|
Update for 6.2.12
As I posted over in my electrical thread I started, electrical is done, safe and legal! Whew, took me 7 hours but it's ready to roll.
Today we're replacing the pressure plate with a NOS unit we snagged off E-Bay. First however, it is time to tackle replacing the rear seal.  . Dad seems to think 4hrs at the most as he did this in 1963 when he got the car. Him and his Dad did this in the driveway, engine in car obviously. Soooooooooo, we shall see. Hoping it isn't an entire day's project. Wife and I are gonna roll under there and start making our way to the rear seal this morning. Once that's buttoned up the clutch set up goes back together, trans back on bellhousing and get that bolted back together. MAY get the exhaust installed while we're under there but hedging on that idea. Forgot how TINY the factory exhaust was. Kinda thinking about taking our new pipes we got from Larry's up to the exhaust shop and having them duplicate in larger diameter. We shall see. . Dad seems to think 4hrs at the most as he did this in 1963 when he got the car. Him and his Dad did this in the driveway, engine in car obviously. Soooooooooo, we shall see. Hoping it isn't an entire day's project. Wife and I are gonna roll under there and start making our way to the rear seal this morning. Once that's buttoned up the clutch set up goes back together, trans back on bellhousing and get that bolted back together. MAY get the exhaust installed while we're under there but hedging on that idea. Forgot how TINY the factory exhaust was. Kinda thinking about taking our new pipes we got from Larry's up to the exhaust shop and having them duplicate in larger diameter. We shall see.
Meanwhile, got our truck load of parts from Larry's the other week. Box was big enough I could have been shipped in it! . Got carpet and weatherstrip, some various emblems, hardtop weatherstrip kit, etc. etc. Carpet is nice but afraid the shifter location isn't gonna work with our 4 speed. Not sure how to get around that fact, might have to send back and find something else. I've seen carpet on E-Bay that is offered with or without the shift hole in the carpet. Ugh, swear I am going to be on Xanax before this project is done .
Off we go. Should be going for a spin tonite. Least we got properly functioning exterior lighting now. Heehee
|
|
By slumlord444 - 13 Years Ago
|
|
There is another solution for the carpet problem if you want to do a lot of fabricating. There is a previous post here on what I did to my '57 with a toploader. I fabricated an adapter plate to move the hurst shifter back and to the left so it was centered in the original shifter hole directly below the hole in the factory chorme plate. Cut the Hurst handle off and welded the original Bird shift handle to it at the same height and angle of the original. Have the original handle with the Hurst and 4 speed under it. Had to lengthen the shift rods. Was a trick to get the bottom of the shifter to clear the frame but it does. Carpet will fit as per original. 
|