|
By Aris - 6 Months Ago
|
Ooopppsss I am reposting this from the Street forum, I think it is better here 😅
Hi all you Y-block lovers! I'm new to this forum from Athens, Greece with my '54 Mercury Monterey driver. It has the original 239 with low mileage, manual with Overdrive, 6volt positive ground, the 2140 Teapot and, the ' temperamental' Load-O-Matic..
Before learning that need a SUN machine, way back I tried to adjust the spring weights and really messed it up. I found one in England but it came back and still is no good. I've always had problems and lately it misfires especially in the mid RPM range.
Here are my novice questions for your kind expert consideration:
1. Is there a way I can manually tune the springs without the SUN machine?
2. Are there reliable Load-O-Matic tuners in the states I can send it for proper tuning?my Load-O-Matic for tuning or I just forget about them?
3. Should I simply forget about it and go for a point unit with centrifugal weights like the ones used in the later Y-Block engines? And frankly I would like to keep it as buy now. I ( I can easily do Ted 's vacuum Teapot conversion I read about in this forum) know it quite well
4.
5. I am also open foran HEI distributor that looks like my original and can fit with the shaft length and tang coupling to the oil pump. However there is a question with the wiring of my overdrive's kick down switch wiring on the coil, because I tried the Pertronix unit it way back and it did not work.
That's it, thank you all in advance
Aris
|
|
By DANIEL TINDER - 6 Months Ago
|
|
Don’t know about the 2140, but the weak vacuum signal with the Holley 4000 not only needs a SUN machine for precise adjustment, but one with the tall manometer accessory (not many have that). I adjusted the springs in my Loadomatic for a more aggressive curve, but also have an old aftermarket advance limiter part. Better acceleration performance, but crappy gas millage, since the limiter won’t allow the very high advance level needed for cruising economy. A centrifugal distributor and carb mod would be a much simpler solution. Or, if you have the time to waste. you could just trust to ‘trial & error’, and play with the springs until things improve (?).
|
|
By Aris - 6 Months Ago
|
Hi Daniel,
Thanks for the reply, can you suggest which centrifugal distributor I should look for?
|
|
By KULTULZ - 6 Months Ago
|
If it is a 54 MERC, it should have the 256CI ENGINE (CLV).
Did it receive a FORD 239CI (DIF) swap at some point?
|
|
By Ted - 6 Months Ago
|
Some basic questions first before getting into some actual fixes.
As Kultulz brings up, is this a 239 or is it a 256 engine?
Are you using a timing light to verify the actual ignition timing and at the same time using that same timing light to watch the timing mark move up and down as the engine rpm is moved up and down?
Does the engine have a solid front lower pulley for the generator/water pump belt or does it have a rubber mounted damper? If a rubber mounted damper, has the zero or ‘TDC’ timing mark on the damper been checked to verify that it does indeed reside at TDC?
|
|
By KULTULZ - 6 Months Ago
|
|
Can the OP two posts be combined to cause less confusion?
|
|
By Aris - 6 Months Ago
|
Thanks for the prompt response guys!
Frankly I don't know if I have the 239 or the 256, I only assumed that In 1954 they only came with the 239.
The car came here some 35 years ago from the US and it showed only 6,000 miles on it and I strongly believe it was correct because besides the outer paint, every single detail on that car seemed to be brand new!
The plate shows SN 54SL22371M, STYLE BR73C and body spec. 04-460-22M-590 without an engine number on it or anywhere else stamped on the engine that I can see.
Maybe it is elsewhere?
Ted yes, for timing I use a timing light and yes the mark moves when I rev it
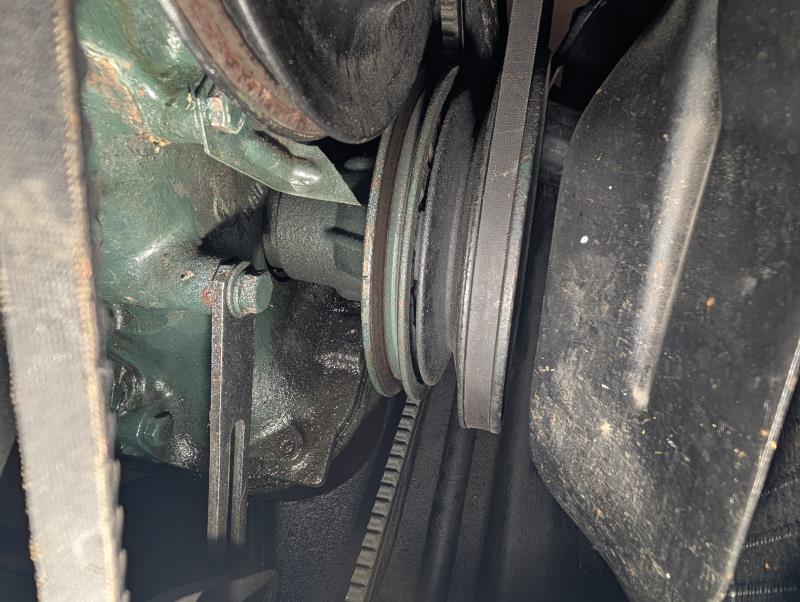
It has a solid pulley for generator and water pump and in front of it has also one more double pulley for the power steering belt. Sorry I Don't understand what you mean by rubber damper, the picture should explain what I have.
Now the Zero on the timing must be ok because I've added 35.000 on and it was running ok. My misfiring problems, (recently most prominent in the mid pms) started when I messed up myself with the distributor springs. I sent it to a guy with a SUN machine in England, but apparently it was not done properly. Then again The Loadomatic has gone in and out many times so I don't know.
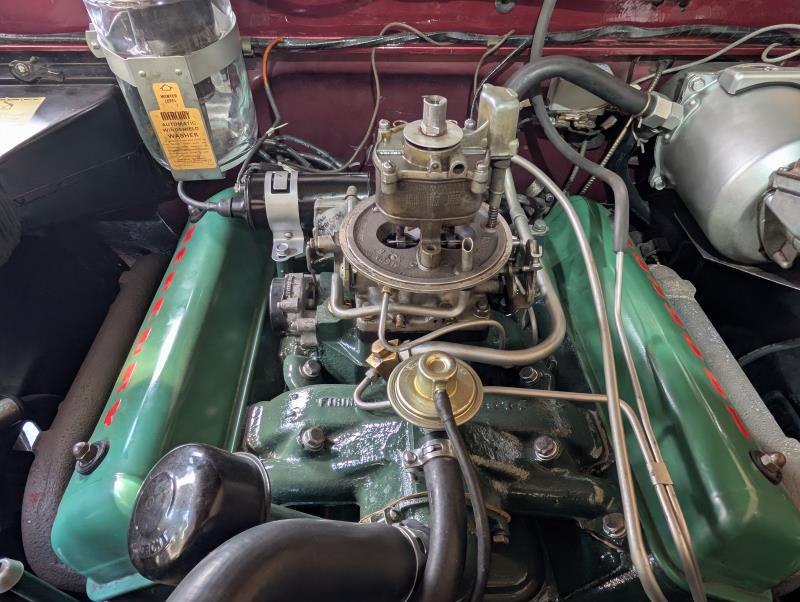
I have added also some more pictures of the engie
|
|
By alanfreeman - 6 Months Ago
|
|
Judging from the pictures, the engine looks like a 256 not a 239.
|
|
By Hoosier Hurricane - 6 Months Ago
|
|
Changing to a centrifugal advance distributor, whether '57 and up Ford or aftermarket, will require changing the oil pump to hex drive and using the hex drive shaft. Worth the effort in my opinion.
|
|
By KULTULZ - 6 Months Ago
|
That is a 256CI 4V particular to 1954 MERC -
http://www.coolcarsimport.fr/decodeur-de-vin-mercury-50-57/
|
|
By KULTULZ - 6 Months Ago
|
You have a very well preserved survivor.
BEFORE any upgrades, please take extensive photos and save all take-off parts so as you can share the assembly details with others. I would think there are quite a few restorers that would like to document what you have.
|
|
By FORD DEARBORN - 6 Months Ago
|
|
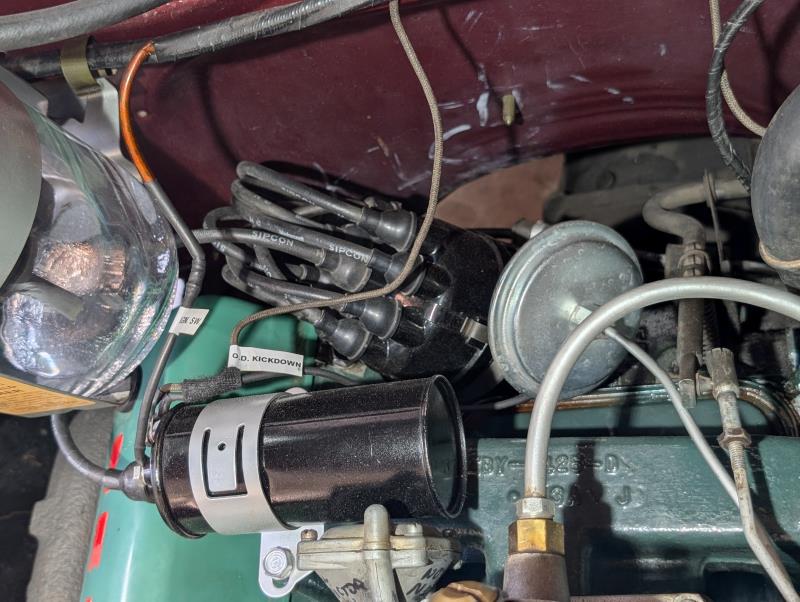
A lot of excellent information and a lot of choices in all the above. You did state the distributor was sent out to someone who had a Sun machine which produced no favorable results. Maybe?? the distributor isn't the issue. I noticed the vehicle has vacuum operated power brakes along with the usual vacuum lines for the wiper system and the heater control valve. Have you tried temporarily blocking/plugging all those vacuum lines to see if a vacuum leak might be a contributing factor? The spark plug wires are the early carbon "Sipcon" wires that were like most all early carbon wires, not very reliable, even in the day. Coil, condenser and points? Also, if I needed to set up a Load-O-Matic and didn't have a distributor machine, I would try using a vacuum gauge and a hand operated vacuum pump plumbed to the vacuum diaphragm. It would be a pain but with a timing light you might get a good idea of how the distributor is functioning. Just my 2cents, welcome to the site and good luck.... Very nice Mercury - when able, share some more pics of the car.
|
|
By Ted - 6 Months Ago
|
|
KULTULZ (5/14/2025)
Can the OP two posts be combined to cause less confusion?
I have put a lock on the duplicate post that’s in the ‘Street’ section to prevent responses to that particular post. That should help to eliminate two sets of replies for the same topic.
|
|
By Ted - 6 Months Ago
|
|
Aris (5/14/2025)
It has a solid pulley for generator and water pump and in front of it has also one more double pulley for the power steering belt. Sorry I Don't understand what you mean by rubber damper,
Being a solid pulley in your case is expected to have the TDC mark reasonably close to where it is supposed to be. The rubber mounted dampers are prone to slippage at the timing marks and that does pose a tuning issue when that happens.
I only mention the rubber damper as it was unknown at the time if the engine had been upgraded to newer parts or possibly even another engine during the last 70 years. I bring this up due to working on a 1954 Ford Y for a customer that ended up being a 292 with the ’54 timing cover, distributor, oil pump, water pump, fuel pump, etc. Externally, the engine looked like a 239 without delving into specific block and head casting numbers. That engine was then upgraded with the 1955 and newer parts to make it more road friendly in the event parts were needed to be replaced during a road trip.
|
|
By Ted - 6 Months Ago
|
|
Aris (5/13/2025)
1. Is there a way I can manually tune the springs without the SUN machine?
Without the aid of a distributor machine, your timing light can be used for determining your existing ‘no load’ distributor curve. As a general rule, adding shims reduces the total amount of timing and taking shims away increases the total amount of ignition timing. From what you are describing, you need to add shims assuming of course that this an ignition problem.
As mentioned by John (Hoosier Hurricane), upgrading to a newer distributor, oil drive, and oil pump would help to simplify working on the ignition curve. If retaining the model 2140 Holley, then the same modifications performed to the Holley 4000 carbs to make them compatible with the later model ignitions would be doable.
And as Ford Deaborn brings up, the issue may be something other than the ignition. Has a compression test on the engine been performed? What condition are the spark plug wires? Are you using ethanol blended fuel? If so, try running a fuel with a reduced ethanol blend or no ethanol at all and see if that helps.
|
|
By KULTULZ - 6 Months Ago
|
|
If one modifies a LOM style carb to signal a DUAL ADVANCE DIST, is that modification permanent or can it be reversed if wanting to later revert back to LOM (restoration purposes)?
|
|
By KULTULZ - 6 Months Ago
|
'ya know ...
Back when, it (TUNE - POINTS REPLACEMENT) paid flat rate to remover the DIST and set it up on a DIST MACH as to dwell, point tension and correct advance. You know as well as I do that it rarely happened. The TECH threw in a set of points and condenser and drove it out.
|
|
By Ted - 6 Months Ago
|
|
KULTULZ (5/15/2025)
If one modifies a LOM style carb to signal a DUAL ADVANCE DIST, is that modification permanent or can it be reversed if wanting to later revert back to LOM (restoration purposes)?
That’s a ‘Yes’ on being able to reverse the modification on a model 2140 or 4000 Holley 4V carburetor and be able to go back to the Load-O-Matic (LOM) distributor. That carburetor modification for using a later model mechanical distributor simply blocks the venturi assisted portion of the vacuum signal to the distributor.
Removing the freshly installed nipple and plugging the hole at the outside of the carburetor would be one method for reversing the modification but if it’s a standard shift vehicle, then the modified screw in the bottom would need to be replaced with a long stem version along with installing the small plastic ball that sits on top of that stem. If it’s an automatic transmission equipped car, the modified short stem screw at the bottom of the carburetor can stay in place. An optional method is to remove the short stem screw at the bottom of the carburetor and simply drill a small hole through both sides of the tube used for the new nipple, replace the screw, and install a rubber cap on the exposed end of the nipple on the outside of the carburetor. Either of these scenarios would restore the original vacuum signal assuming the spark advance valve is also in place.
|
|
By KULTULZ - 6 Months Ago
|
THANX TED - MUCHLY APPRECIATED!

|
|
By KULTULZ - 6 Months Ago
|
... hmmpf ...
Actually read the TECH ARTICLE and now I understand.
Never actually needed to know before ...
|
|
By Aris - 6 Months Ago
|
HI all of you great guys, I really appreciate your comments that give me more and more insight into my Merc's tech. It's amazing how nowadays communication has advanced to the point where we can help each other around the world. Being far away I started back in 1968 to
communicating with the US with letters and later on with faxes!
Taking into account all your valuable help I have a first decided not to swap the Loadomatic with a newer one, as yes KULTUZ I am also addicted to originality and after all it used to work ok for many years.
Now with your eager help yesterday
I ordered from eBay a
NOS (!!!) distributor on eBay and also another NOS distributor gear to go on my spare Loadomatic who's gear is missing. Now with three distributors available I'm going to spend the time to try and adjust the primary and secondary springs testing it on the road.
I'll double check my timing and everything else as suggested. As I'm only a DIY limited mechanic, Ted kindly explain to me what you mean by shimming have no idea what and how you mean this.
Also FORD DEARBORN please be more specific about ''using a vacuum gauge and a hand operated vacuum pump plumbed to the vacuum diaphragm'' is this a way I can set up the primary and secondary springs to my curve as per my manual?
|
|
By Aris - 6 Months Ago
|
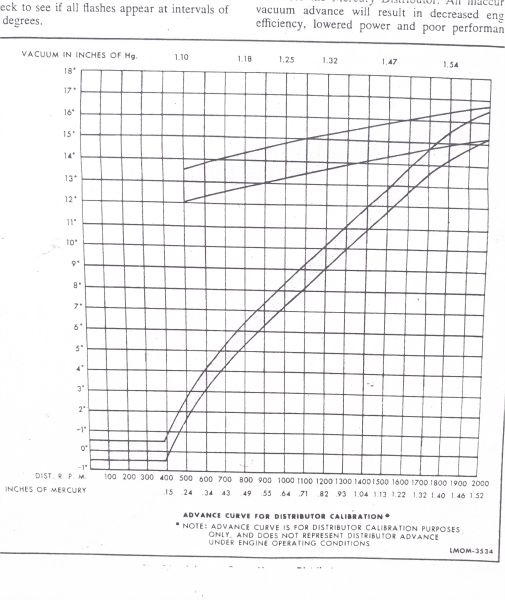
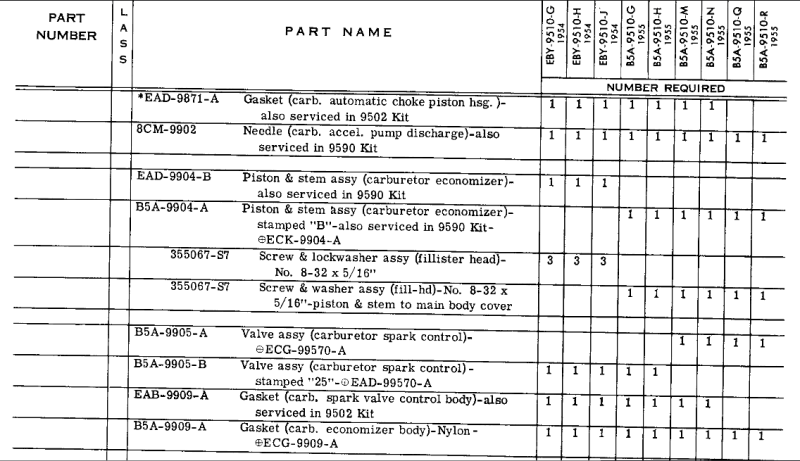
Here is a pic from my manual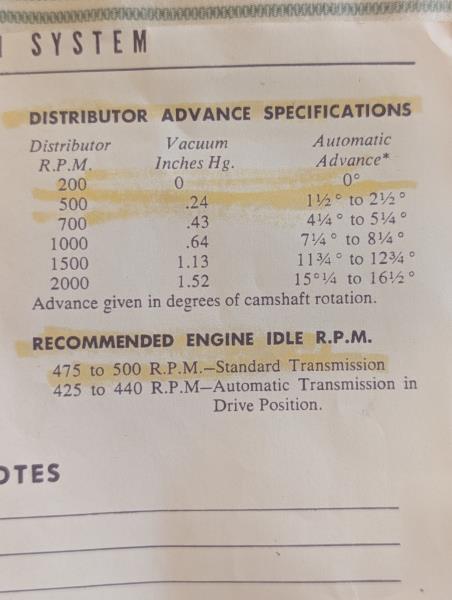
|
|
By KULTULZ - 6 Months Ago
|
That chart gives you how the DIST ADVANCE as was curved by the factory.
You can find the exact curve in your 54 MERC WSM under IGN - SPECIFICATIONS using the DIST ID NO.
It will be tough without the DIST MACH and manometer (LOM).
CLICK HERE - http://m571.com/yblock/loadomatic.htm
GOOD LUCK WITH HER ...
|
|
By FORD DEARBORN - 6 Months Ago
|
|
The vacuum pump mentioned, is often used to bleed brakes. If you do a search on the net, these vacuum pumps should come up. There are also various vacuum gauges available but will require some plumbing work to "T" into a vacuum line. With the gauge and vacuum pump attached directly to the distributor advance can, you should be able to see with a timing light how the advance is responding in relation to the vacuum signal applied. This will not be precise but with a little experimentation, you may be able to get a feel for how well the advance is responding. I have rebuild/recurved numerous distributors through the years and indeed have a proper machine to do this. However, I have little experience with the Load O Matic. My 1955 Ford truck shop manual shows 4.5 to 6 inches of mercury/vacuum for the various engine and distributor combinations. As KULTULZ asks: What is the exact curve in the 54 Merc WSM? Hope this helps, let us know....
|
|
By Aris - 6 Months Ago
|
KULTUZ and DEARBORN first I attach the curve chart. The check valve is another eye opener!
If I am correct based on the article my check valve should be marked with a 6 or a 7, correct?
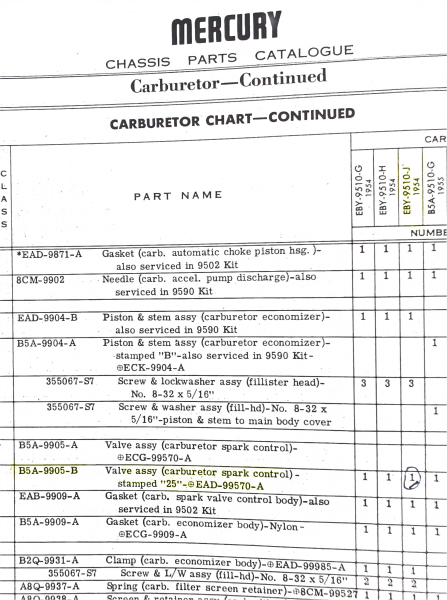
However, I'm a bit confused because in my picture the Mercury parts book lists it with PN. B5A-9905-B but mentions ' stamped 25' unless this is for a Ford PN?
DEARBORN I believe you're showing me a way to adjust the springs while on the car, correct ? I have a brake bleeder pump and extra vacuum gauge and hoses and T's, no problem. Now if I got this right using the T I should splice it in the venturi vacuum line then observe the numbers based on my specs. ( I need to cut and add a hose along the metal line, something I wanted to do way back anyway)
There is another test I have to do about shimming which I had no idea about as Ted mentions
So Monday when back I have some great work to do! Yesssss🥳
|
|
By Aris - 6 Months Ago
|
.....
Without the aid of a distributor machine, your timing light can be used for determining your existing ‘no load’ distributor curve. As a general rule, adding shims reduces the total amount of timing and taking shims away increases the total amount of ignition timing. From what you are describing, you need to add shims ...
Ted ( I tried quoting hope it works)
I used GPT to learn about shimming distributors as I had no knowledge of it, so when setting the timing, I certainly did not rev up to observe any problem ..
It could be that I have messed things up up because at one point, if my failing memory is correct, I put chose and used the best shaft on my current distributor, and probably moved the single gear I had. So much for my expertise 😭
Any instructions or links how to best shimm it will help! Thanks
|
|
By KULTULZ - 6 Months Ago
|
Mercury parts book lists it with PN. B5A-9905-B but mentions ' stamped 25' unless this is for a Ford PN?
The 'STAMPED 25' merely ID's the SPARK CONTROL VALVE if say you have an assortment out of the parts box. There is only one listed for your application. I think what is meant by 'shimming' is the addition/removal of shims in the DIST ADV CANISTER to control the vacuum advance. This was used on later DUAL ADVANCE. I believe this is what is being discussed. You will notice on the BREAKER PLATE (12151) POST (12357) that hold the advance springs that they can be adjusted by rotating them (to adjust spring tension). You will have to have a very sensitive vacuum gauge to measure correctly the small signal given by the carb. What are the DIST ASSY ID NOS on all of your distributors? You may have a NOS that is calibrated correctly already.
 |
|
By Aris - 6 Months Ago
|
This is my spare Loadomatic without gear but I have ordered one.
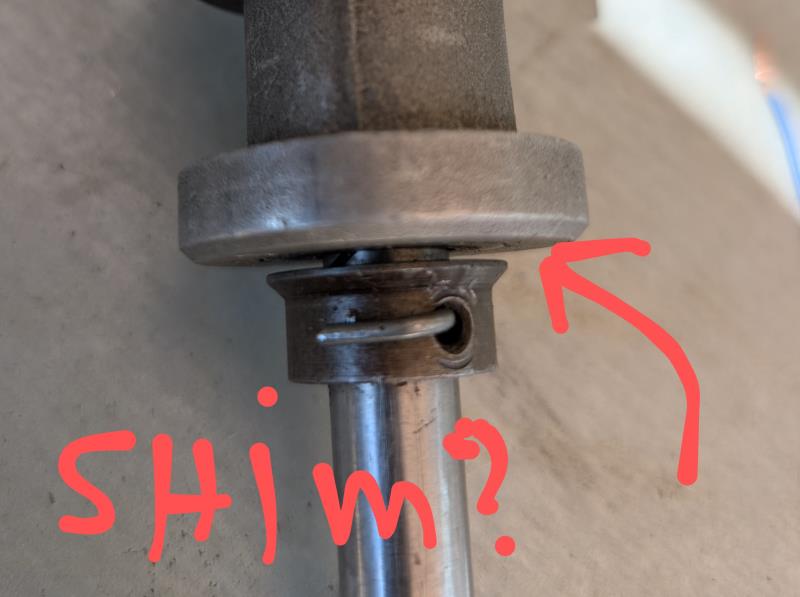
On the shaft I measure 0.058'' play, if this is the place to shim, what should the tolerance be
?
[ img]http://forums.y-blocksforever.com/uploads/images/59f1cc9b-9194-4cb3-b916-92e5.jpg[/img] img]http://forums.y-blocksforever.com/uploads/images/59f1cc9b-9194-4cb3-b916-92e5.jpg[/img]
|
|
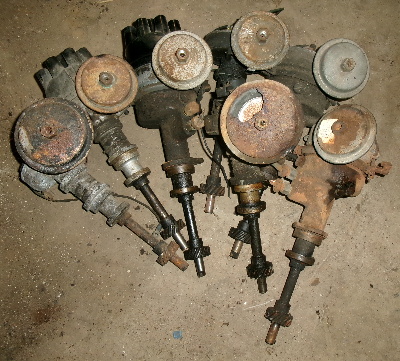
By Aris - 6 Months Ago
|
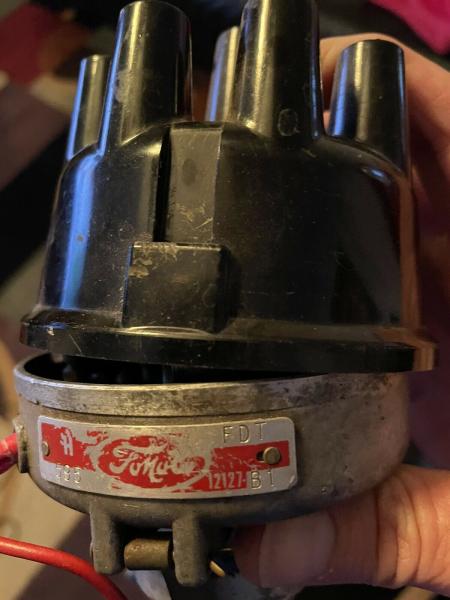
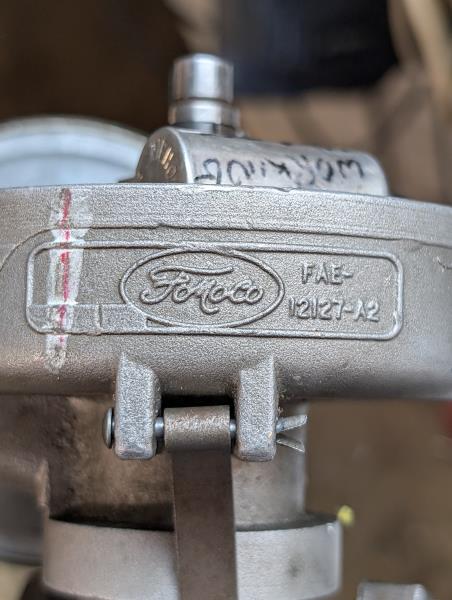
Yes KULTUZ, that is why I bought a NOS from eBay yesterday, hoping it comes pre-adjusted. It is PN FAE-12127-A as shown on the picture , my spare one minus the gear I ordered is FAE-12127 A2 and the one on the car must be the same. My parts manual has three PN's, FAE 12127-C (which I wrote must be for the Police Merc of those days as I found also a Police Teapot version), a FDC 12127-A and a FEC-12127-A
So all numbers are the same, so I believe and hope all will fit.
|
|
By Aris - 6 Months Ago
|
Yes KULTUZ, that is why I bought a NOS from eBay yesterday, hoping it comes pre-adjusted. It is PN FAE-12127-A as shown on the picture , my spare one minus the gear I ordered is FAE-12127 A2 and the one on the car must be the same. My parts manual has three PN's, FAE 12127-C (which I wrote must be for the Police Merc of those days as I found also a Police Teapot version), a FDC 12127-A and a FEC-12127-A
So all numbers are the same, so I believe and hope all will fit.
|
|
By FORD DEARBORN - 6 Months Ago
|
|
The photo with "shim?" with arrow is not where shims are installed, if anywhere. That "collar" is to be tightly held in place with a roll pin. The collar should be pinned to allow a minimum of .020" up and down thrust of the shaft. My 1955 book calls for .020 to .024" thrust. The correct position of the gear is also a critical dimension that must be followed. Trying to precisely adjust the advance springs while in the engine will be challenging. Standard vacuum gauges are not accurate enough to split an inch of vacuum/mercury into a fraction but by experimentation you may get the "feel" of it. The vacuum advance canister will need to be disconnected from the carburetor and then plumbed to the pump and gauge because with no load on the engine, the air flow through the carb will not provide a good and proper signal. There are devices available that can be plumbed in for precisely measuring small vacuum signals. If you would like to see the one I have, I'll gladly try sending a pic of it. As stated above, the NOS distributor you have may be calibrated well enough out of the box. You could push a vacuum hose against the canister connection and with the other end clinched in your teeth, make sure everything moves freely.
|
|
By Ted - 6 Months Ago
|
Aris (5/17/2025)
TedWithout the aid of a distributor machine, your timing light can be used for determining your existing ‘no load’ distributor curve. As a general rule, adding shims reduces the total amount of timing and taking shims away increases the total amount of ignition timing. From what you are describing, you need to add shims ...
Ted (I tried quoting hope it works)
I used GPT to learn about shimming distributors as I had no knowledge of it, so when setting the timing, I certainly did not rev up to observe any problem .
It could be that I have messed things up because at one point, if my failing memory is correct, I put chose and used the best shaft on my current distributor and probably moved the single gear I had. So much for my expertise 😭
Any instructions or links how to best shim it will help! Thanks
My bad on the comment about the shims as that was a memory hiccup on my part. I was originally referring to shims in the vacuum can and not the end play for the lower gear. 0.022-0.030” is the 1957 specification for the distributor end play so it should be similar for the earlier model distributors.
The dual diaphragm L-O-M distributors and the 1957 and up distributor vacuum pots did have some adjustability at the vacuum chambers by using different shims, springs, and spacers. Looking through my stash of early single diaphragm L-O-M distributors, they all have non-adjustable vacuum pots.
|
|
By KULTULZ - 6 Months Ago
|
Ted, I can in no way imagine you as being 'bad'.
It finally dawned on me 'shimming' was meant to located the driven gear correctly on the shaft.
|
|
By KULTULZ - 6 Months Ago
|
FORD DEARBORN POSTED -
'The photo with "shim?" with arrow is not where shims are installed, if anywhere. That "collar" is to be tightly held in place with a roll pin. The collar should be pinned to allow a minimum of .020" up and down thrust of the shaft. My 1955 book calls for .020 to .024" thrust. The correct position of the gear is also a critical dimension that must be followed.'
There is your answer for the correct driven gear placement.
If one has a DIST that needs the driven gear relocated, the normal practice is (was) to locate the collar/gear and re-drill the shaft ninety degrees off and insert new pins.
If you have a NOS DIST, all of the adjustments should be correct out of the box.
Be mindful that the actual DIST ASSY CASTING NO on the bowl is an ID NO and not a SERVICE PN. The SERVICE PN(s) you find in the CHASSIS CATALOG(S) may be superseded PN's and may cause confusion.
The correct vacuum signal from the carb has to be determined first before trying to change the DIST SETTINGS.
If after installing the NOS DIST you bought, if she rattles on acceleration get back as FORD had a fix for that.
Any questions at all just ask and someone will help you with them.
Still waiting for glamour shots of the car ...
|
|
By Aris - 6 Months Ago
|
|
Thanks a million KULTULZ! Am on it this week to determine timing and other parameters however, to make a decision decide first I have to take delivery of the NOS as mentioned.
|
|
By DANIEL TINDER - 6 Months Ago
|
|
Another advantage of a NOS unit over one merely sent out to be setup on a SUN machine (assuming it was originally done right at the factory), is the fresh shaft & bushing. The improved performance compared to one with worn parts is VERY noticeable. Of course, the ideal would be a fresh rebuild by a reputable expert with the full SUN complement, and a good stock of NOS, USA-made & specially tested ancillary parts (points, condensers, etc). Just finding a condenser with the right value, and points with the correct spring tension puts you a ‘leg up’ to start.
|
|
By pintoplumber - 6 Months Ago
|
|
Aris, does the new NOS distributor and the new gear you have ordered have the 13 tooth count? Not 14 teeth.
|
|
By KULTULZ - 6 Months Ago
|
I just had a revelation - 
If you bought DIST ASSY PN FAE 12127-A, it was released for the 1954 PASS CAR and LT 239CI (EBU), and will have a different timing curve than the 1954 MERC 256CI engine.
FYI - PN FAE 12127-A2 would have been the service replacement PN for the FAE 12127-A DIST.
|
|
By Aris - 6 Months Ago
|
Dark, Sad Monday .....
Today I went back to basics so after confirming the timing Ok I decided to run one more dry/wet compression test, this time with a loaned dial compression meter, instead of my 40+ year old Motometer.
The results have put me in a really depressing mood and proved that my Motometer is only good for garbage...
Using GPT and the 120psi spec from my manual I got results showing among others a dry spread of 35psi (from 70 to 105) when the factory limit is only 15 and an overall spread of 70–130psi between dry and wet!
So while I was stupidly looking elsewhere, the cold number conclusion is that
my engine is quite worn, most likely with moderate ring wear on most cylinders and some really bad ones as well.
I still believe that the 6,000 miles the car came with here with, almost 40 years ago, is not wrong. The fact is that I am only a DIYer self-taught mechanic and I was apparently wrong in believing I could start driving it as if it was new. By adding 40,000 miles on it has taken its toll, as has been the case with my differential that I ended up having to replace it when it went bad some years back.
Now I am faced with hard to make decisions, however this time I believe I have Y-blocksforever to back me up 😅I'm contemplating repairing the 256 locally which with parts etc is an ordeal I have lived many times before with my other classics. Importing a short or long block is an option but in both cases I have to put into the equation shipping and custom duties 😪😪😪.
I read a higher than my 256 block are more available. Could I go higher while maintaining an almost complete authenticity 'look-wise' and use my peripheral parts? Should I go for the Loadomatic or a later one? I still want to keep my 6volts and if possible my 2140 Teapot so how does that chime in?
Your expert advise on this apparent headache will be greatly appreciated!
Thank you in advance!
Aris
|
|
By KULTULZ - 6 Months Ago
|
TO BE 100% OF ENGINE CONDITION -
The compression test has to be done dry and wet to determine rings. It may be they are stuck because of sitting all these years. You will also need to perform a CYL LEAK-DOWN TEST as this will differentiate either rings or leaking valve(s). Maybe adjust the valves before the LEAK-DOWN TEST.
QUALITY OIL PRESSURE GAUGE.
You need a GOOD QUALITY COMPOUND VACUUM GAUGE to help diagnose.
Yes, you can use a later larger engine and keep the appearance of the OEM 256. It all depends on how you want to show and drive the car.
This is subject to the opinion of others here as this site has many talented people participating.
|
|
By KULTULZ - 6 Months Ago
|
- VACUUM GAUGE READINGS -
|
|
By pintoplumber - 6 Months Ago
|
Aris, if you can get a 272/292 crank and 272 pistons, you can turn your 256 into a 272. I would change to the 1957 and up distributor for better performance.
I changed my 239 into a 283 with a crank and rods from a 312. I have the newer distributor. I took off the 14 tooth gear and used my old 13 tooth gear. You would also need to change the oil pump and drive.
|
|
By Aris - 6 Months Ago
|
"quote-message">Aris, does the new NOS distributor and the new gear you have ordered have the 13 tooth count? Not 14 teeth
PINTOPLUMBER unfortunately I did not ask, frankly I was not aware that I should. For $69.95 for a NOS Loadomatic I just grabbed it.. even though with shipping, customs and VAT it goes way higher but I hope it is the correct and it will be pre-adjusted so my my ignition questions will be resolved!
|
|
By Aris - 6 Months Ago
|
Monday was bad... Today I feel better, in my ignorance though
😁
I examined the timing and found that even though at idle, 500, and 1.000 RPM the advance was very near the chart's values, at high RPM like 2.000 instead of 15 degrees, it shot totally out of range like over 30!!!
Does that prove that the springs are not properly tuned? I'm not sure as I tested it without disconnecting the vacuum line and I wonder if that makes a difference.
So patience is the key, the NOS LOM is on the way, due here in approximately 25 days, I can't wait.
|
|
By Aris - 6 Months Ago
|
KULTULZ (5/19/2025)
- VACUUM GAUGE READINGS -
|
|
By KULTULZ - 6 Months Ago
|
"I examined the timing and found that even though at idle, 500, and 1.000 RPM the advance was very near the chart's values, at high RPM like 2.000 instead of 15 degrees, it shot totally out of range like over 30!!!
Does that prove that the springs are not properly tuned? I'm not sure as I tested it without disconnecting the vacuum line and I wonder if that makes a difference."
If it hit 30 degrees @ WOT, the full advance is working correctly.
Can you again describe what exactly what the engine is doing?
|
|
By Aris - 6 Months Ago
|
KULTULZ pls explain @ WOT
Well it misfires.
It idles quite well, misfiring now and then, but above 2000 it starts misfiring a lot, constantly or continuously. Near top RPM it kind of quiets and it is not as noticeable, I presume as the momentum helps it running better, anyway it is not as prominent as in mid RPM
Same behavior on the road, low speeds runs just fine, but it struggles to cruise at high speed.No hard 'jerks?', just continuous misfiring and never going top speed, even though I haven't pushed it.
I have ruled out fuel starvation that I am familiar with its symptoms and to me it is an ignition problem.
The primary spring is very loose and the secondary seems ok, however they are very different from each other.
I will try splicing a vacuum gauge in the line and test it running, based the timing chart and report my findings.
I also have a bunch of new springs I've collected, perhaps I'll try them, but my hopes are with the new one coming
To eliminate a vacuum problem I would like to know if the Power Check valve is correct. The PN is 25R- 80A-29 but I don't know how to order as Holley goes by numbers 5,6 etc. and the carb kits I get are cheap no number ones. I have on a Holley marked 7 or 6,5 I think
Thanks for your help!
|
|
By KULTULZ - 6 Months Ago
|
Sorry about that -
WIDE OPEN THROTTLE
Is gasoline (GREECE?) STRAIGHT OR ETHANOL LACED?
|
|
By KULTULZ - 6 Months Ago
|
"Well it misfires.
It idles quite well, misfiring now and then, but above 2000 it starts misfiring a lot, constantly or continuously. Near top RPM it kind of quiets and it is not as noticeable, I presume as the momentum helps it running better, anyway it is not as prominent as in mid RPM
Same behavior on the road, low speeds runs just fine, but it struggles to cruise at high speed.No hard 'jerks?', just continuous misfiring and never going top speed, even though I haven't pushed it.
I have ruled out fuel starvation that I am familiar with its symptoms and to me it is an ignition problem."
I would think either IGN misfire or a vacuum leak.
Don't worry about DIST signal now. The vacuum gauge has to be connected to A INTAKE MANIFOLD VACUUM source to read the engine. You also should take a FUEL PRESSURE and VOLUME TEST with the same gauge.
How long since the car has been serviced (tune-up - filters)?
So the car has 6000 miles on the odometer? How long has it sat without driving? Is the gasoline somewhat fresh?
CLICK HERE - https://www.amazon.com/Jewkot-Ignition-Indicator-Cylinder-Diagnosis/dp/B0CXXQVQG5?c=ts&dib=eyJ2IjoiMSJ9.vCW20b1siDE5XOF-j4OmNe1Xx9BzB0oX1oVVBZc-iGkRMKB_SZXuHeQzVw0lADQV9nfcDcIJnaAkBqoDq6fvtrIccqCxtpzmQQ8bySBUmK__jrj2ZNp8pvv3vL2gK7eWQ4QY0dTvEdhsaZK7tUiCueXajo_FhVpXp2EMyoENZ0XBdBMbN8yZqjQNSyDFMqQ-eXJHJQ4klkDJEAqoM6Uxt7wW8Lj91tq4aW670Yd4yaXeZuWIFRr7gs6TpUkhea8YvX0HWIfITEZmVIdvK_3IhzQK3hoGNbB1GAMKO2iWSm4.DOJPA3e6fDfTtKddZ8Hr6natzYIBKwn0CCSOwZT5bpw&dib_tag=se&keywords=Ignition+Testers&qid=1747778036&s=automotive&sr=1-29&ts_id=15707441
|
|
By KULTULZ - 6 Months Ago
|
"I have ruled out fuel starvation that I am familiar with its symptoms and to me it is an ignition problem.
The primary spring is very loose and the secondary seems ok, however they are very different from each other."
The breaker plate springs (2) are different, one being PRIMARY and one being SECONDARY.
"I will try splicing a vacuum gauge in the line and test it running, based the timing chart and report my findings.
I also have a bunch of new springs I've collected, perhaps I'll try them, but my hopes are with the new one coming."
Maybe not actually cut the signal tube. You can fashion a test tube with nipples for signal testing. I don't believe the DIST is out of calibration.
"To eliminate a vacuum problem I would like to know if the Power Check valve is correct. The PN is 25R- 80A-29 but I don't know how to order as Holley goes by numbers 5,6 etc. and the carb kits I get are cheap no number ones. I have on a Holley marked 7 or 6,5 I think"
Are you describing the SPARK CONTROL VALVE or the actual CARB POWER VALVE?
|
|
By Aris - 6 Months Ago
|
Ok, EU countries should have 10% ethanol in the 95 unleaded, but I was told we have only 5%. In any case, it should be in between the two.
I use on classics Lead additive, but at less than what the manufacturer specifies unless I'm going on highways where I follow what's written on it.
The valve I probably did not name properly is the one my original Hollley 2140. I read that it is the one that should open I believe between 6 or 7 whatever units the vacuum is measured with, to provide vacuum to the LOM distributor.
|
|
By KULTULZ - 6 Months Ago
|
"The valve I probably did not name properly is the one my original Hollley 2140. I read that it is the one that should open I believe between 6 or 7 whatever units the vacuum is measured with, to provide vacuum to the LOM distributor"
 BASIC PART NO. 9905
In 1995, the BASIC PN (9905) went to BPN 9B572 in MERC CATALOGING so that PN (B5A 9905-B) may have been upgraded and hard to find. |
|
By Aris - 5 Months Ago
|
Hi all! I have spent this time receiving parts and working on the project of making the LOM work like it used to.
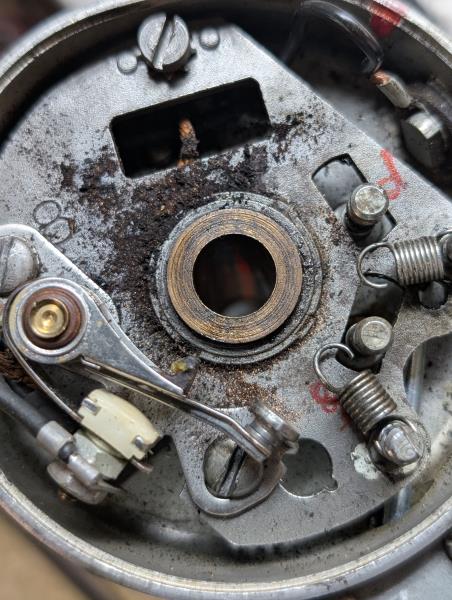
Today I took the distributor out and as you can see on the picture first thing I see is brass shavings where the bottom side of the rotor was brushing on the top part of the shaft bushing.
I don't remember adding grease or oil there except in the oiler tube but that one lubes the shaft itself, not the top of it's bushing.
I'm at a loos as to why, I have to recheck my manual for the proper position of the shaft gear, because I replaced it and maybe I didn't do it right, but then again I don't know where that shaft should be actually ''sitting''
Or maybe I should have added a dab of Grease up there? I'm not sure.

|
|
By Aris - 5 Months Ago
|
|
Ok, I measured the gear position on the shaft and it is shorter than what the spec is, so it was my daft previous assembly that did the damage... Back on repositioning now....
|
|
By KULTULZ - 5 Months Ago
|
At least you found the answer ...
Is the bushing OK do you think?
|
|
By Aris - 5 Months Ago
|
KULTULZ (6/6/2025)
At least you found the answer ... Is the bushing OK do you think?
KULTULZ with three (!) distributors on my bench now, of which one was the NOS, I home to get somewhere 😛
I've chosen the NOS one to rebuild but had to swap it's gear as it came with 13 teeth. I positioned the 14 gear on the bench (4.991" to 4.996") but thought of checking the end play on the engine and I was lucky as I had to add 1/64 to reach the end play spec.
I thought I was doing well until on the NOS plate I checked the eccentric posts with a tool I made myself and one of them was frozen stuck and broke off 😝.... BTW that plate did not look NOS to me...
I'll go for the best one of the other two plates I have, but I still have to remove and reassemble the gear before I start the engine and go from there.
I was also very lucky to find two new Spark Check Valves from Mac's carburetors, as before I get on to adjusting the springs I want to make sure I have the correct spark plug vacuum values before attacking the springs.
|
|
By KULTULZ - 5 Months Ago
|
|
I checked the eccentric posts with a tool I made myself and one of them was frozen stuck and broke off 😝.... BTW that plate did not look NOS to me...
No reason to try and turn the post(s)s (most likely frozen) as it is a fine tune that requires the correct DIST MACHINE setup.
I thought you were going to install the NOS DIST you acquired to see if that was the problem?
|
|
By KULTULZ - 5 Months Ago
|
Here is an interesting read concerning FBO IGN ability to convert a small bowl LOM DIST to mechanical and vacuum advance. The only thing that would give it away would be the DUAL ADVANCE VACUUM CANISTER -
- http://forums.y-blocksforever.com/Topic148849-15.aspx
|
|
By Aris - 5 Months Ago
|
KULTULZ thank for your your follow ups!
On the NOS distributor I had to swap the 13 tooth to a 14 one and the vacuum chamber was 1/2 the diameter of the ones for my Y-block so even though it is a NOS, apparently it came from another V8 engine, I have no idea from what. Now when testing the pivots the primary broke so besides everything else, I now have to swap the plate too.
Your link for a Pertronix in a centrifugal distributor is very interesting but after trying them many years ago, I went back to points.
The main reason reason was that they were very sensitive to the correct voltage, so on my 6-volt cars they often did not work on start up when those vintage starters were pulling all the battery's juice. Perhaps in 12volts they are ok but for 6volt cars I had a negative experience.
On my 24v miltary Willys M38 they were fine, but I burned two of them because the ignition was left on. The Mercury had an additional problem as the Pertronix module would not engage the kickdown of my overdrive circuit.
I'm bidding my time to get the LOM working and if not I understand my last resort will be a centrifugal distributor along with a geared oil pump and shaft. Ted's straightforward Teapot modification will give one more DIY project that I can undertake in-between our summer heatwaves 😂
|
|
By KULTULZ - 5 Months Ago
|
|
On the NOS distributor I had to swap the 13 tooth to a 14 one and the vacuum chamber was 1/2 the diameter of the ones for my Y-block so even though it is a NOS, apparently it came from another V8 engine
Post the DIST ID STAMPING NO from the bowl and I will give you the intended application -
|
|
By DANIEL TINDER - 5 Months Ago
|
Something to consider: When rebuilding a LOM, if originality is not important, NOS aftermarket Y-Block ‘dual points’ kits may still be available, and a way to maximize performance/reliability. The included advance plate may even have roller bearings (?). If economy also is not a concern, advance-limiting devices were offered (Offenhouser?), which allowed a more aggressive ignition curve (lower spring tension).
Of course, a dual advance distributor and a modern carb. would be simpler (and likely easier to set up properly).
|
|
By KULTULZ - 5 Months Ago
|
|
The Mercury had an additional problem as the Pertronix module would not engage the kickdown of my overdrive circuit.
I have heard that ...
Were you using the IGNITOR I or II?
Of course, a dual advance distributor and a modern carb. would be simpler (and likely easier to set up properly).
A DUAL ADVANCE requires a 12V NEG system where the 54 and 55 were 6V POS. This MERC is a cherry and would be a shame to modify.
|
|
By KULTULZ - 5 Months Ago
|
Similar thread from another forum -
https://www.fordbarn.com/forum/showthread.php?t=349646
|
|
By Aris - 5 Months Ago
|
KULTULZ (6/9/2025)
On the NOS distributor I had to swap the 13 tooth to a 14 one and the vacuum chamber was 1/2 the diameter of the ones for my Y-block so even though it is a NOS, apparently it came from another V8 engine
Post the DIST ID STAMPING NO from the bowl and I will give you the intended application -
Ok here are the three distributors.
1. FAE 12127-C H342 On the car recently
2. FAE 12127-A2 The one I had spare. No aluminum label, number is raised on the bowl
3. FAE 12127-A H461 The 'NOS' I bought now that came with 13 teeth, frozen pivot and wrong vacuum diaphragm*
*Note I tested it but it held no vacuum, took it apart and found a small 0.10 hole on the diaphragm, I can only guess it was not from a car with a ported, but another one with manifold vacuum
I'll mount the #3 NOS and proceed as follows:
Set initial timing without vacuum attached
Try to test on the car the 5 Teapot Spark Valves I have, and use the one closest to the hg performance from graph hg specs.
Add vacuum and TRY TO adjust timing based on the graph, using the springs I have. Primary spring spring up to 1000 RPM and then up to 2000 with the secondary spring.
One point that I realized too late is that the RPM values shown in my book are for the distributor RPM whereas for the harmonic balance the should be X2😛
Self made, DIY mechanic, too far away...but I love working as much as I like driving🙂↕️
|
|
By Aris - 5 Months Ago
|
KULTULZ and ALANFREEMAN you got it right! I have a 256 ci as confirmed after the engine casted number has now appeared next to the distributor!
Interestingly when the car was imported here, the customs could not find it, they were looking for a stamped number near the water pump as in GM later engines. So my Greek documents in engine they have noted ' without number' 😄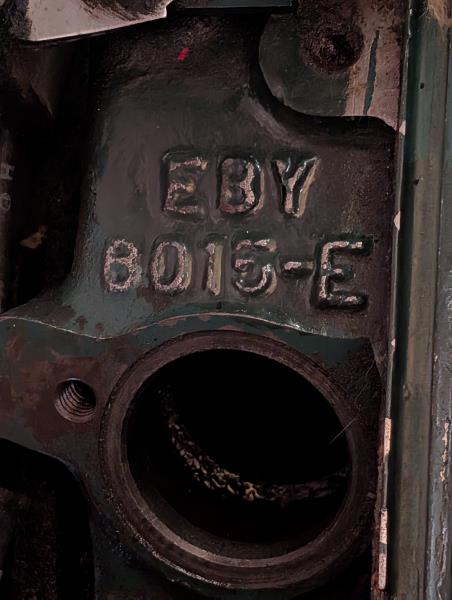
|
|
By DANIEL TINDER - 5 Months Ago
|
KULTULZ (6/9/2025)
A DUAL ADVANCE requires a 12V NEG system where the 54 and 55 were 6V POS. This MERC is a cherry and would be a shame to modify.
Not so. Ignition points work just fine with 6V/+grd., and the mechanical & vacuum advance mechanisms have nothing to do with electronics.
|
|
By KULTULZ - 5 Months Ago
|
|
Not so.
Ignition points work just fine with 6V/+grd.,
If the points/cond are for a 6V system
... and the mechanical & vacuum advance mechanisms have nothing to do with electronics.
I do not remember saying that,
|
|
By KULTULZ - 5 Months Ago
|
|
Ok here are the three distributors.
1. FAE 12127-C H342 On the car recently
2. FAE 12127-A2 The one I had spare. No aluminum label, number is raised on the bowl
3. FAE 12127-A H461 The 'NOS' I bought now that came with 13 teeth, frozen pivot and wrong vacuum diaphragm*
OK, it seems the ID PLATE (on some early FYB's and STAMPING NOS on some later LOM are actually SERVICE PN's.
|
|
By KULTULZ - 5 Months Ago
|
The only use of dueling points (back in the day) was a longer dwell and a higher degree of coil saturation (especially with a period ignition amplifier).
With today's' TECH, there is little reason (IMO) for them.
|
|
By KULTULZ - 5 Months Ago
|
|
3. FAE 12127-A H461 The 'NOS' I bought now that came with 13 teeth, frozen pivot and wrong vacuum diaphragm*
*Note I tested it but it held no vacuum, took it apart and found a small 0.10 hole on the diaphragm, I can only guess it was not from a car with a ported, but another one with manifold vacuum
- 1948-1956 TRUCK MPC - 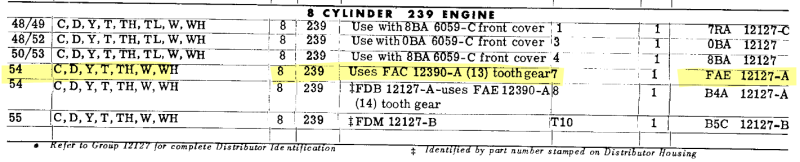
So the NOS FAE 12127-A you have is for a light truck application and the advance curve will most likely be very lazy.
You can find the exact distributor calibrations in each model year WORKSHOP MANUAL.
|
|
By DANIEL TINDER - 5 Months Ago
|
KULTULZ (6/10/2025)
Not so.
Ignition points work just fine with 6V/+grd.,
If the points/cond are for a 6V system
... and the mechanical & vacuum advance mechanisms have nothing to do with electronics.
I do not remember saying that,
Re-read your post: (“A DUAL ADVANCE requires a 12V neg. system”….)
A 6V condenser..sure. But, I don’t believe the 12V neg. points would have trouble conducting 6V + grd. current (unless there is some issue I’m missing?).
Re: ‘dual points’: Since 6V electronic distributor options are quite limited, dual points may well offer longevity/reliability advantages in addition to better performance.
|
|
By KULTULZ - 5 Months Ago
|
|
Re-read your post: (“A DUAL ADVANCE requires a 12V neg. system”….)
An OEM DUAL ADVANCE DIST (1957/ ) requires a 12V SYSTEM, unless modified in a fashion to operate off a 6V SYSTEM.
This gentleman has a CHERRY 54 MERC SURVIVOR that he wants to remain as OEM ASSEMBLY.
He has a drive-ability concern that he wants to address while retaining the FACTORY ASSEMBLY LOAD-O-MATIC. I agree with his approach. He feels the problem is within his LOM DIST. I am just giving him the info and choices he is seeking
I realize my CRS is rapidly advancing and I cannot seem to understand where you are going.
Exactly what is it you are trying to get across?
|
|
By KULTULZ - 5 Months Ago
|
The LOM IGN SYSTEM required the DIST to be removed and set up on a DIST MACHINE (whether a tune-up or drive-ability concern).
Points dwell, breaker arm tension, and advance curves were verified and corrected at that point. The DIST was re-installed and if drive-ability was still a concern, the MECHANIC/TECH would go into the fuel and advance signal system.
You can use timing tapes, an extremely sensitive vacuum gauge along with prayers and hopes until the cows come home.
There are PERTRONIX SYSTEMS that will replace the points/condenser on a 6V (POS or NEG GRD) LOM DIST. That takes care of any DUAL POINTS setup.
The points style DIST was phased out in 1974/1975 production and for good reason (IMO).
Would I personally use a LOM DIST? Not unless the car was a survivor or correct restoration.
|
|
By Aris - 5 Months Ago
|
KULTULZ (6/10/2025)
Ok here are the three distributors.
1. FAE 12127-C H342 On the car recently
2. FAE 12127-A2 The one I had spare. No aluminum label, number is raised on the bowl
3. FAE 12127-A H461 The 'NOS' I bought now that came with 13 teeth, frozen pivot and wrong vacuum diaphragm*
OK, it seems the ID PLATE (on some early FYB's and STAMPING NOS on some later LOM are actually SERVICE PN's.
OK KULTULZ, here is the one with no tag.
BTW I'm wondering if my mechanical DIY ignorance got me to this point: could the whole misfiring issue have started not from the LOM 'peculiar' tuning but from an EXPANDED shaft lobe, that was heating up because of the constant rubbing on the brass bearing? Just a thought, because I have put on 30,000 miles and I don't remember when the misfiring problems started. And of course back then I did not read (or understand?) my manual's clear instructions on having a 0.020'' gap under the lobe ...
Here is the pic of the one I had on that was misfiring. Again I have no recollection of how long it had been operational on the car to relate it to when the misfiring started. Memory was always one of my weak points but now at late 70s it is much worse....
|
|
By KULTULZ - 5 Months Ago
|
|
... could the whole misfiring issue have started not from the LOM 'peculiar' tuning but from an EXPANDED shaft lobe, that was heating up because of the constant rubbing on the brass bearing?
Yes. If the bushing is worn, it will allow the DIST SHAFT to wallow and the points opening and dwell will be affected.
[B[ EDIT[/B] - If the shaft is not in correct alignment (defective bushing) it may also cause excessive wear of the actual cam (and points set rubbing block) also, especially if not lubed correctly during service.
There is an oil cup in older DIST that allows the bushing to be lubed at service intervals.
Can you wiggle the shaft and notice unusual excessive side to side movement within the bushing?
 As for CRS, it is rampant here also. Ask me how I know ... |
|
By KULTULZ - 5 Months Ago
|
Discussing CRS ... 
OK KULTULZ, here is the one with no tag.
Actually, it is an IDENTIFYING TAG but just in another format.
HOLLEY was the vendor for FORD IGN and FUEL for that period. It may be the tagged ones were issued at the CLEVELAND PLANT and the bowl ID was issued at the DEARBORN PLANT.
The DIST tagged FAE-12127-C is the correct DIST for your engine (CLEVELAND ENGINE - CF).
FAE-12127-A is a DIST (13T) for the DEARBORN plant (DIF) and was issued for the light and medium truck 239CI.
Usually, when a PN SUFFIX ( -A in this instance) had a numerical character after it ( -A2 in this instance), it was an indication of an upgraded/improved replacement PN. FAE-12127-A2 is not cataloged so it may have been described in a SERVICE LETTER of that period.
Regardless, hold onto the original DIST as it will increase the value of the car.
|
|
By DANIEL TINDER - 5 Months Ago
|
KULTULZ (6/12/2025)
Re-read your post: (“A DUAL ADVANCE requires a 12V neg. system”….)
An OEM DUAL ADVANCE DIST (1957/ ) requires a 12V SYSTEM, unless modified in a fashion to operate off a 6V SYSTEM.
This gentleman has a CHERRY 54 MERC SURVIVOR that he wants to remain as OEM ASSEMBLY.
He has a drive-ability concern that he wants to address while retaining the FACTORY ASSEMBLY LOAD-O-MATIC. I agree with his approach. He feels the problem is within his LOM DIST. I am just giving him the info and choices he is seeking
I realize my CRS is rapidly advancing and I cannot seem to understand where you are going.
Exactly what is it you are trying to get across?
Just that it is possible to improve performance while retaining the 6V system. He’s not doing a concours restoration. BTW: His problem with a 6V Pertronics is common (overdrive draws too much juice).
|
|
By Hoosier Hurricane - 5 Months Ago
|
|
Back on page 6 Aris said he took the 13 tooth gear off his NOS distributor and put the 14 tooth gear on. I thought 239s and 256s had 13 tooth gears, '55 and later engines had 14 tooth. If the distributor he took out of the engine had 14 teeth, then he doesn't have a '54 engine. Or a '55 or later camshaft has been installed, which is not a direct fit in '54 engines. Maybe someone has put a '55 or later short block in his car.
|
|
By KULTULZ - 5 Months Ago
|
|
Back on page 6 Aris said he took the 13 tooth gear off his NOS distributor and put the 14 tooth gear on. I thought 239s and 256s had 13 tooth gears, '55 and later engines had 14 tooth. If the distributor he took out of the engine had 14 teeth, then he doesn't have a '54 engine. Or a '55 or later camshaft has been installed, which is not a direct fit in '54 engines.
There were two 1954 FYB engine series -
- the DEARBORN built 239CI which was the EBU BIG CAM ENGINE and had the 13T cam drive.
- the CLEVELAND built 239-256CI which were the SMALL CAM ENGINE(s) (EBV and EBY respectfully) and required the 14T cam drive.
|
|
By KULTULZ - 5 Months Ago
|
|
Just that it is possible to improve performance while retaining the 6V system.
It most certainly is possible to improve performance with a LOM install, but the subject was SERVICE REPAIR, not SERVICE UPGRADE or MODIFICATION. The OP wants the car to run correctly in it's original assembly
He’s not doing a concours restoration.
No need for a restoration. Did you see the under hood shot(s)? Which method is going to result in a more valuable car, the OEM system(s) or a resto-mod?
THANX! for finally coming to your point.
|
|
By Hoosier Hurricane - 5 Months Ago
|
|
Kultulz, thanks for that information. I never knew there were two different 239/256 series, I thought they were all the same.
|
|
By Aris - 5 Months Ago
|
HOLLEY was the vendor for FORD IGN and FUEL for that period. It may be the tagged ones were issued at the CLEVELAND PLANT and the bowl ID was issued at the DEARBORN PLANT.
The DIST tagged FAE-12127-C is the correct DIST for your engine (CLEVELAND ENGINE - CF).
KULTULZ am I given in my ignorance another chance? I have already seen this listing https://ebay.us/m/8MK0dF but made nothing of it because it is not a Ford one. Now with your endless expertise you wrote that Holley made them for Mercury!
The description is "NOS 1954 Mercury car HOLLEY DISTRIBUTOR Model# 1275-S part# R-844-1AS This is a bid for a new old stock distributor for a '54 Merc made by the Holley
Carburetor Co.It has a 14-tooth gear, and includes the points & condenser.
The original box is included but it is very poor. Part Number A414 " A414 "
The seller has 100% feedback and on the sNOS box it's written For 54 Mercury!!! I've asked him just now if he can tell if it has ever been used
What do you say, shall I go for it? I have not yet tried tuning the one on the car.
I'm probably wrong but could I have a 100% original solution if I build the one you wrote that came with the car, with the ''innards" of this Holley? Ok maybe I'm again beng daft?
|
|
By KULTULZ - 5 Months Ago
|
|
Kultulz, thanks for that information. I never knew there were two different 239/256 series, I thought they were all the same.
You are more than welcome. Just one 256CI SERIES as it was a CLV (CF) engine (as far as I know). The 256-4V was also used in the 1954 FORD as a police engine. That engine is not cataloged in the 1949/1959 FORD MPC. Most likely cataloged in a SPECIAL POLICE CATALOG.
It gets even more confusing with the gradual transition of the truck 256CI to the 272CI (1955-56).
|
|
By KULTULZ - 5 Months Ago
|
KULTULZ am I given in my ignorance another chance? I have already seen this listing https://ebay.us/m/8MK0dF but made nothing of it because it is not a Ford one. Now with your endless expertise you wrote that Holley made them for Mercury! The description is "NOS 1954 Mercury car HOLLEY DISTRIBUTOR Model# 1275-S part# R-844-1AS
Well, No.1 is that you are not ignorant.
The problem is that you have come across a CHERRY 54 MERC and of course where you are located makes it even more difficult for you to find advice, parts and service.
HOLLEY made for FORD-LINC-MERC as well as FORD TRUCK. They also made for others like INTERNATIONAL HARVESTER.
The DIST shown (HOLLEY) is not a FORD ISSUE, it is a type of service replacement (similar to aftermarket service parts of the period). A FOMOCO specific DIST will be ID'd by the two TAG/DIST BOWL examples already discussed.
HOLLEY also made in his period a series named ROTO-VANCE (both vacuum and centrifugal advance) which was a HP offering and frequently used to replace the LOM DIST.
You have the correct DIST on the car.
|
|
By Aris - 5 Months Ago
|
|
Ok, there is a. 'In 1 cart" note on it, so I took my chances and bought it..... Hope this time it works out good, and yes, I won't touch the pivots😛 I'm keeping my fingers crossed!
|
|
By KULTULZ - 5 Months Ago
|
|
Ted yes, for timing I use a timing light and yes the mark moves when I rev it
If you see the timing mark advance with the timing light, the advance should be good.
If you put a vacuum signal on the vacuum advance canister (with a hand held vacuum pump or mouth suction), does the breaker plate advance and return (after releasing vacuum) easily and does the vacuum canister hold vacuum?
If that low of mileage, the DIST advance may be hanging but not totally dysfunctional.
Exactly what is (are) the drive-ability concern(s)?
|
|
By Aris - 5 Months Ago
|
KULTULZ (6/13/2025)
Ted yes, for timing I use a timing light and yes the mark moves when I rev it
If you see the timing mark advance with the timing light, the advance should be good.
If you put a vacuum signal on the vacuum advance canister (with a hand held vacuum pump or mouth suction), does the breaker plate advance and return (after releasing vacuum) easily and does the vacuum canister hold vacuum?
If that low of mileage, the DIST advance may be hanging but not totally dysfunctional.
Exactly what is (are) the drive-ability concern(s)?
Hey KULTULZ your reply came to Greece! I wish I'll get it working with such smaller problems 😅
|