Profile Picture

Distributor wire routing

Posted By Kahuna 9 Years Ago
You don't have permission to rate!
Author
Message
Kahuna
Posted 9 Years Ago
View Quick Profile
Supercharged

Supercharged (1.2K reputation)Supercharged (1.2K reputation)Supercharged (1.2K reputation)Supercharged (1.2K reputation)Supercharged (1.2K reputation)Supercharged (1.2K reputation)Supercharged (1.2K reputation)Supercharged (1.2K reputation)Supercharged (1.2K reputation)

Group: Forum Members
Last Active: 6 Years Ago
Posts: 471, Visits: 2.4K
When I bought my Fairlane, all the ignition wires were way too long and laying on the manifolds, some burned.
I removed them and then removed the distributor cap, making note on the firewall where the rotor faced so I'd remember to put everything back together properly. Then I removed the distributor for rebuilding. So far so good.
Holidays arrived and nothing got accomplished. Grandson stayed with us awhile and wanted to help with the car, so I had him clean and sand the firewall for paint (see where this is going?).
Well, it wasn't until I had finished the painting that I remembered that the mark is now GONE.
In the interim, I bought new wires and the original type of wire routing hardware. I will next get some wire numbers once I start assembling this mess.
OK, now, here's the question:
How did the wires orient in the CAP when new (where was number 1)? My cap is unmarked.
To assemble this stuff, I'll begin by installing the wires (correctly, I hope) on each plug and then work my way back thru the wire holders, then to the distributor.
I can figure out the distributor to TDC.
Any suggestions?
Sorry for the long drawn out stuff
Jim


paul2748
Posted 9 Years Ago
View Quick Profile
Supercharged

Supercharged (6.8K reputation)Supercharged (6.8K reputation)Supercharged (6.8K reputation)Supercharged (6.8K reputation)Supercharged (6.8K reputation)Supercharged (6.8K reputation)Supercharged (6.8K reputation)Supercharged (6.8K reputation)Supercharged (6.8K reputation)

Group: Forum Members
Last Active: Yesterday
Posts: 3.6K, Visits: 497.6K
I think the first thing you want to do is to insert the distributor into the engine and orient it so you have room to move the distributor for retard/advance without interference with the intake.  I checked my distributor and  looking at the distributor from the passenger side, number one is down and to the left a little.  It lines up closely to the bottom clip.

The suggestion I would make is to get those little doohickey/s that go on the wires that have the  #'s on them.  Put one at the distributor end, the other at the plug end.


54 Victoria 312;  48 Ford Conv 302, 56 Bird 312
Forever Ford
Midland Park, NJ

MoonShadow
Posted 9 Years Ago
View Quick Profile
Supercharged

Supercharged (7.7K reputation)Supercharged (7.7K reputation)Supercharged (7.7K reputation)Supercharged (7.7K reputation)Supercharged (7.7K reputation)Supercharged (7.7K reputation)Supercharged (7.7K reputation)Supercharged (7.7K reputation)Supercharged (7.7K reputation)

Group: Forum Members
Last Active: Yesterday
Posts: 4.6K, Visits: 38.1K
As long as you follow the firing order and counter clockwise rotation it dosent matter where you put the number one wire. I think commonly looking from the passenger side number one wire is next to the inside clip on the distributor. A mentioned make sure you can get sufficent rotation with the vacume advance to set timing. When you turn the distributor to set timing you dont want the advance pot to hit the firewall .http://forums.y-blocksforever.com/uploads/images/0711db68-7518-4e0a-99e2-6617.jpg

Y's guys rule!
Looking for McCullouch VS57 brackets and parts. Also looking for 28 Chrysler series 72 parts. And early Hemi parts.

MoonShadow, 292 w/McCulloch, 28 Chrysler Roadster, 354 Hemi)
Manchester, New Hampshire
Kahuna
Posted 9 Years Ago
View Quick Profile
Supercharged

Supercharged (1.2K reputation)Supercharged (1.2K reputation)Supercharged (1.2K reputation)Supercharged (1.2K reputation)Supercharged (1.2K reputation)Supercharged (1.2K reputation)Supercharged (1.2K reputation)Supercharged (1.2K reputation)Supercharged (1.2K reputation)

Group: Forum Members
Last Active: 6 Years Ago
Posts: 471, Visits: 2.4K
Hi Paul & Moon
Thanks so much. The diaphram hitting the firewall is a good thought
Jim
GREENBIRD56
Posted 9 Years Ago
View Quick Profile
Supercharged

Supercharged (2.3K reputation)Supercharged (2.3K reputation)Supercharged (2.3K reputation)Supercharged (2.3K reputation)Supercharged (2.3K reputation)Supercharged (2.3K reputation)Supercharged (2.3K reputation)Supercharged (2.3K reputation)Supercharged (2.3K reputation)

Group: Forum Members
Last Active: Last Year
Posts: 1.7K, Visits: 102.7K

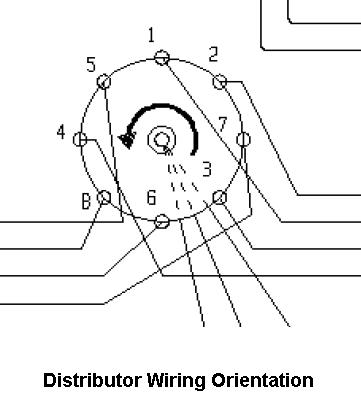
After a lot of trials - I ended up with this basic orientation of the plug wires - trying to get the lengths to work out. The plan being to end up with the engine at the initial timing mark - and the number 1 plug wire right at the front. This diagram is drawn as if the carb would be at the top center of the page. On mine the vacuum pot has been located with the inlet nipple pointing roughly at the center of the carb. All of this takes some artful adjustment of the gear tooth engagement - trial and error.

http://forums.y-blocksforever.com/uploads/images/54ee5bd3-976d-42fc-8311-858e.jpg 


http://forums.y-blocksforever.com/uploads/images/9ea2bf28-00c4-4772-9ac7-d154.jpg 
 Steve Metzger       Tucson, Arizona
Kahuna
Posted 9 Years Ago
View Quick Profile
Supercharged

Supercharged (1.2K reputation)Supercharged (1.2K reputation)Supercharged (1.2K reputation)Supercharged (1.2K reputation)Supercharged (1.2K reputation)Supercharged (1.2K reputation)Supercharged (1.2K reputation)Supercharged (1.2K reputation)Supercharged (1.2K reputation)

Group: Forum Members
Last Active: 6 Years Ago
Posts: 471, Visits: 2.4K
Thankyou also, Greenbird.
As I'm using the original double diaphram distributor now, I've also purchased the needed metal vacuum lines (pre bent, and hopefully correct), and will attempt to use them to assist in the distributor positioning when I get to it.
Right now I'm in the process of replacing the front cross member, then I can begin reassembly of this thing.
I need some good weather.
You guys are all so helpful. I really appreciate it.
Regards
Jim
Talkwrench
Posted 9 Years Ago
View Quick Profile
Supercharged

Supercharged (1.6K reputation)Supercharged (1.6K reputation)Supercharged (1.6K reputation)Supercharged (1.6K reputation)Supercharged (1.6K reputation)Supercharged (1.6K reputation)Supercharged (1.6K reputation)Supercharged (1.6K reputation)Supercharged (1.6K reputation)

Group: Forum Members
Last Active: 4 Years Ago
Posts: 898, Visits: 23.2K
Oohh replacing the front cross member .. Such a fun job ; o )

http://forums.y-blocksforever.com/Uploads/Images/02c74785-3ce2-4b80-a66c-f31f.jpg

"Came too close to dying to stop living now!"
Kahuna
Posted 9 Years Ago
View Quick Profile
Supercharged

Supercharged (1.2K reputation)Supercharged (1.2K reputation)Supercharged (1.2K reputation)Supercharged (1.2K reputation)Supercharged (1.2K reputation)Supercharged (1.2K reputation)Supercharged (1.2K reputation)Supercharged (1.2K reputation)Supercharged (1.2K reputation)

Group: Forum Members
Last Active: 6 Years Ago
Posts: 471, Visits: 2.4K
Hey Talk
How are you doing down under as I recall?
You probably have much better weather there
Jim


Reading This Topic


Site Meter