Profile Picture

Making cab mounting rubbers for a unibody.

Posted By charliemccraney 17 Years Ago
You don't have permission to rate!
Author
Message
charliemccraney
Posted 17 Years Ago
View Quick Profile
Supercharged

Supercharged (9.8K reputation)Supercharged (9.8K reputation)Supercharged (9.8K reputation)Supercharged (9.8K reputation)Supercharged (9.8K reputation)Supercharged (9.8K reputation)Supercharged (9.8K reputation)Supercharged (9.8K reputation)Supercharged (9.8K reputation)

Group: Moderators
Last Active: 20 minutes ago
Posts: 6.1K, Visits: 442.6K
After finding out that the rubbers for a unibody are not reproduced and mine are toast I had to come up with something else.  I found some neoprene spring rubber which is weather resistant, oil resistant, abrasion resistant and impact resistant with a durometer rating of 75A.  Sounds like promissing stuff.  I got some 6" long 2 1/2" diameter with a 3/4" hole through the center pieces.

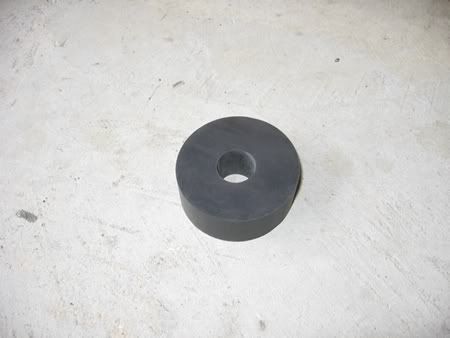
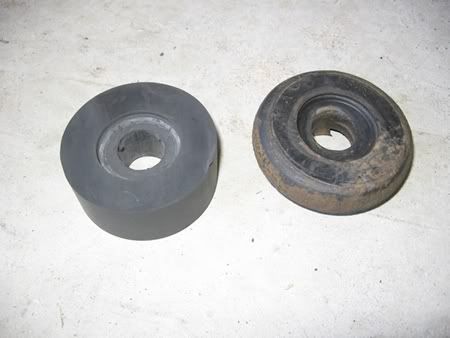
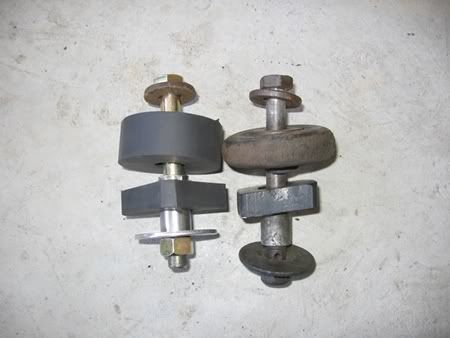
The original upper mounts look like they started life as a 2 5/16" diameter, 1" tall, with a 3/4" hole through the center and a 1 5/16" diameter, 3/16" recess in the top.

The original lower rubber looks like it started out as a 2" x 2" square, 9/16" tall, with a 3/4" hole through the middle.

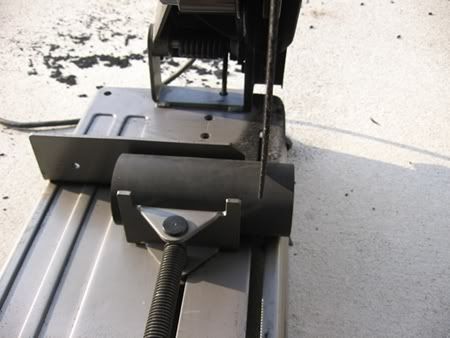
I found that a chop saw does an excellent job of cutting rubber.

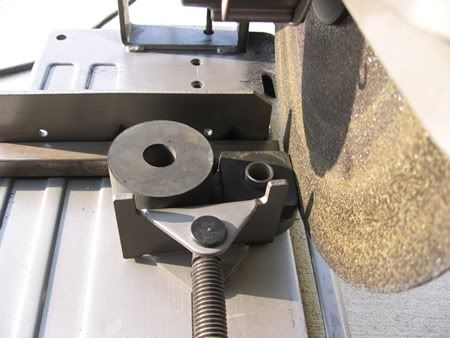
First I cut the top mounts to the 1" thickness required.

Next I had to cut the 3/16" recess for the 1 5/16" washer.  The only thing I had in my tool box that would do this is a vast collection of hole saws.  So I got it set up in my drill press, using a 3/4" hole saw to aproximately locate the center of the rubber followed by progressively larger (or smaller depending how you start out) hole saws, minding the depth of each saw, until I had the cut I needed.  I tried a grinding stone for this operation and it did not work at all.

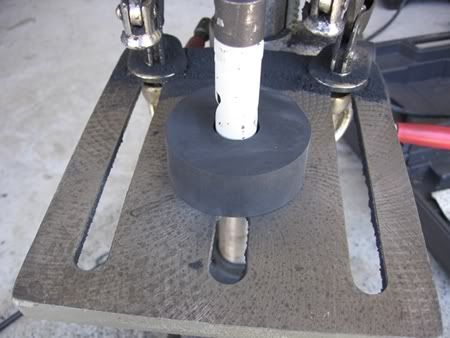
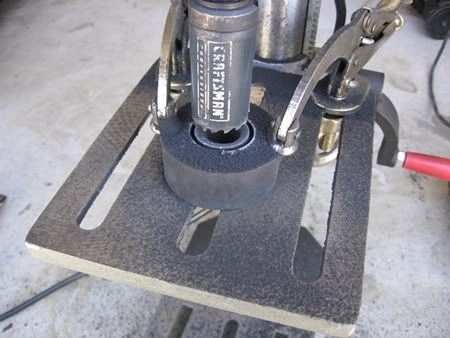
I used a carbide bur with my dremel to clean up the cut.

Now on to the lower rubbers.  I could not find any square bars of rubber with the 3/4" hole so I just used what I had to make them.  I cut them to the 9/16" thickness needed with the chop saw.  Now comes making them square.

I used one of the old rubbers with a 3/4" spacer to approximate the cuts and made the cuts with the chop saw.  The old rubber was removed while making the cuts to avoid damage to it.  Do this until all for sides have been cut.

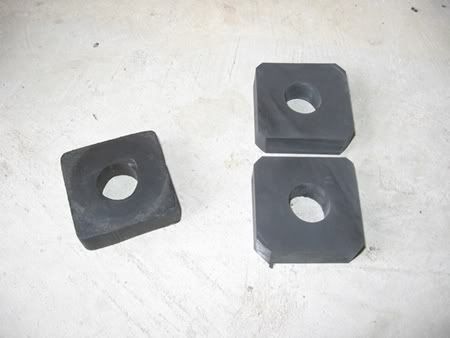
Old on left.  New on right.

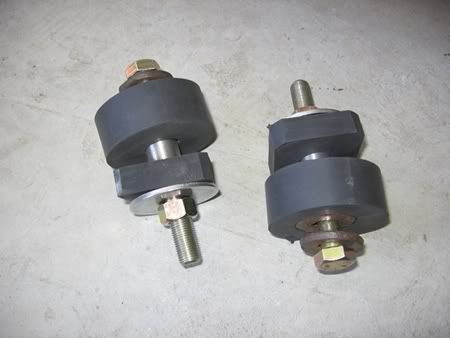
I did not worry about the 3/16" larger diameter (2 1/2" rather than 2 5/16") of the new upper rubbers.  Hopefully it does not come back to bite me in the but.  So now after many, many, many hours of labor the rubbers are ready!

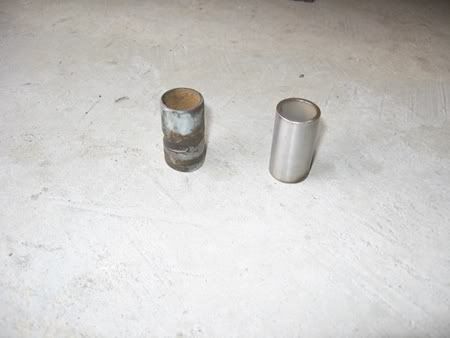
The only other thing I decided to reproduce is the 3/4" od, .600" id, 1 11/32" tall spacer.  I made this out of 3/4", .065" wall stainless steel tube.  This one's easy measure twice, cut once with the chop saw.

I also purchased some grade 8 fine thread 1/2" bolts 4 1/2" long and grade 8 nuts to match.  I was able to find the large od flat washers on the very bottom in stainless.  I could not find the upper 9/16" id, 1 5/16" od, 3/16" thick flat washers in anything - steel or stainnless.  I'll probably have a bud whip out a few on his lathe.

The bolts are only hand tight at the time of writing this.

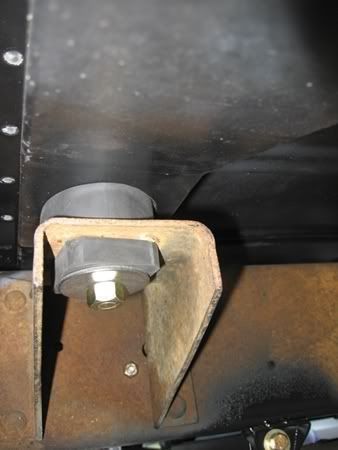
So there.  Hopefully this will help those unibody folks who need to replace cab mounting rubbers but can't find them anywhere.


Lawrenceville, GA
Ted
Posted 17 Years Ago
View Quick Profile
Co-Administrator

Co-Administrator (13.3K reputation)Co-Administrator (13.3K reputation)Co-Administrator (13.3K reputation)Co-Administrator (13.3K reputation)Co-Administrator (13.3K reputation)Co-Administrator (13.3K reputation)Co-Administrator (13.3K reputation)Co-Administrator (13.3K reputation)Co-Administrator (13.3K reputation)

Group: Administrators
Last Active: 11 hours ago
Posts: 7.4K, Visits: 205.8K
Charlie.  That’s some great looking work.  I look forward to seeing both you and your truck at Columbus.

Lorena, Texas (South of Waco)


HT32BSX115
Posted 17 Years Ago
View Quick Profile
Supercharged

Supercharged (593 reputation)Supercharged (593 reputation)Supercharged (593 reputation)Supercharged (593 reputation)Supercharged (593 reputation)Supercharged (593 reputation)Supercharged (593 reputation)Supercharged (593 reputation)Supercharged (593 reputation)

Group: Forum Members
Last Active: Last Month
Posts: 452, Visits: 24.4K
Charlie,


That was a really nice illustration of how to put it all together!


Couple of questions.....


Did you cut the lower ones into squares just to match the old ones or could you have just left them round?


Where did you find the large round cyl of rubber? Did you buy it locally?


Thanks,


Rick


-------------------------------------------------------------------------------------------------------------------------------------------------------------------------------------------------
1955 F-600/272/E4OD// Disclaimer: No animals were injured while test driving my F-600 except the ones I ran over intentionally!

---------------------
This post was created using OpenSuSE Linux x64 and Firefox

charliemccraney
Posted 17 Years Ago
View Quick Profile
Supercharged

Supercharged (9.8K reputation)Supercharged (9.8K reputation)Supercharged (9.8K reputation)Supercharged (9.8K reputation)Supercharged (9.8K reputation)Supercharged (9.8K reputation)Supercharged (9.8K reputation)Supercharged (9.8K reputation)Supercharged (9.8K reputation)

Group: Moderators
Last Active: 20 minutes ago
Posts: 6.1K, Visits: 442.6K
Thanks guys! I will be at Columbus. I think I will just barely have the truck drivable in time. I will finish welding the floor pan this weekend. I'll probably put off grinding the welds until I get back so that I can start building the frame for the bucket seats this weekend as well. Grinding the welds smooth is so time consuming. So I think all I have left is to finish the floor pan, mount the bucket seats, and install seat belts.


I made the lowers square to match the original. I don't think it will matter if they are left round or made square.

I got the rubber and most other materials from Mcmaster-Carr which happens to be pretty close to me. I still have them ship the stuff because it is out of the way to drive.


Lawrenceville, GA
Unibodyguy
Smile Posted 17 Years Ago
View Quick Profile
Supercharged

Supercharged (240 reputation)Supercharged (240 reputation)Supercharged (240 reputation)Supercharged (240 reputation)Supercharged (240 reputation)Supercharged (240 reputation)Supercharged (240 reputation)Supercharged (240 reputation)Supercharged (240 reputation)

Group: Forum Members
Last Active: 13 Years Ago
Posts: 240, Visits: 848
Just let me know how much for these Charlie and where to send the check to. Again very good work!!

                                             Michael

Michael

Sandy Valley, NV

charliemccraney
Posted 17 Years Ago
View Quick Profile
Supercharged

Supercharged (9.8K reputation)Supercharged (9.8K reputation)Supercharged (9.8K reputation)Supercharged (9.8K reputation)Supercharged (9.8K reputation)Supercharged (9.8K reputation)Supercharged (9.8K reputation)Supercharged (9.8K reputation)Supercharged (9.8K reputation)

Group: Moderators
Last Active: 20 minutes ago
Posts: 6.1K, Visits: 442.6K
Sure.  I'll keep you posted.  I would like to put a few miles on them before offering to sell any.  I would hate to sell some without some real world testing and find out that I'm using the wrong sort of rubber, resulting in fast deterioration, or they're too thick, too thin, too hard, etc.


Lawrenceville, GA
charliemccraney
Posted 17 Years Ago
View Quick Profile
Supercharged

Supercharged (9.8K reputation)Supercharged (9.8K reputation)Supercharged (9.8K reputation)Supercharged (9.8K reputation)Supercharged (9.8K reputation)Supercharged (9.8K reputation)Supercharged (9.8K reputation)Supercharged (9.8K reputation)Supercharged (9.8K reputation)

Group: Moderators
Last Active: 20 minutes ago
Posts: 6.1K, Visits: 442.6K
Here they are tightened up.  They are doing well so far.  Well see how they are after it's been cold for a while.

The clutch chatter problem is gone now that the swiss cheese mount has been replaced.  Of all the things people told me to check no one ever thought of body mounts and, in this case, the sheet metal.  It dawned on me that it is probably the reason while I was working on it.  I know I changed a lot of stuff at once but it is the most logical.

A before shot as a reminder.


Lawrenceville, GA


Reading This Topic


Site Meter