Profile Picture

another batch of updates

Posted By Dan 16 Years Ago
You don't have permission to rate!
Author
Message
Dan
Posted 16 Years Ago
View Quick Profile
Supercharged

Supercharged (240 reputation)Supercharged (240 reputation)Supercharged (240 reputation)Supercharged (240 reputation)Supercharged (240 reputation)Supercharged (240 reputation)Supercharged (240 reputation)Supercharged (240 reputation)Supercharged (240 reputation)

Group: Forum Members
Last Active: 14 Years Ago
Posts: 240, Visits: 1.1K
Here are some more pics of our shop project - nothing too exciting to report but progress is slowly moving forward:

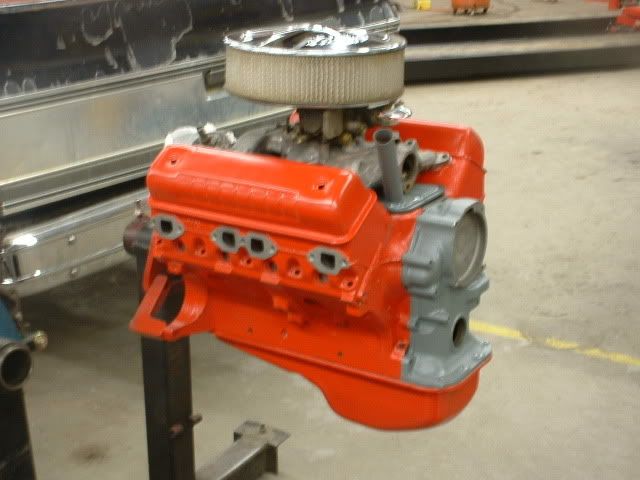
Pretty much have all the parts painted, earlier someone asked about the color and it is supposed to be Ford Red, at least according to what the can says - we are using a Duplicolor ceramic engine enamel in a spray can. Under that is a Napa self etching primer.

Have one head knurled and glyptaled. The knurling will suffice for now, I am looking into getting set up with valve guide replacement equipment, if I do we will install bronze (?? is that what we want ??) guides. Plan to glyptal the lifter valley as well. Any benefit in glyptal inside the oil pan, valve covers, water pump cover, etc.???

The 2bbl and intake will be used for now until I can find a 4bbl intake (or something cooler Smile ) We are deburring the outside of the manifold for looks and plan to gasket match the intake to the heads. We dont have a flow bench so that will probably be the extent of any port & polish type work. Playing around with different cutters and sanding rolls on the air grinder, what is the best speed and how do you acheive it to cut this cast iron?? It's slow going... The big chrome air cleaner will be replace with a smaller (I think they called them "helmet" or "mushroom" type) more period looking piece when I find one. Need to find out what our exact cam specs are before I settle on a carb...

Still waiting to buy all our gaskets, bearings, etc. What is the verdict on a rebuild kit for the water pump? A new one is not that much more than the kit (at RockAuto.Com) should we even mess around rebuilding one? I thin it would be funner than just bolting on a new piece, but will it work okay??? Definately think we will get a rebuild kit for the oil pump - that is way cheaper than a new one. Hope to eventually put a Pertronix in the dist. but may just go with points for now. I thin we will make some header flanges from 3/8 plate. I help up a set of SBC block huggers the other day and I think we may be able to canabalize them and make them work on some new flanges, maybe not, we'll have to see.

The blue engine is a student engine. it basically underwent a "Krylon" rebuild - I let him go on his own so we will see how he did. He plans to install it (I think) into a Willys p/u - dont know if that is a feasible swap or not, guess we'll find out!

Thanks for listening, and a huge thanks for all the advise and parts - this is a great board!!!

Hoosier Hurricane
Posted 16 Years Ago
View Quick Profile
Supercharged

Supercharged (5.0K reputation)Supercharged (5.0K reputation)Supercharged (5.0K reputation)Supercharged (5.0K reputation)Supercharged (5.0K reputation)Supercharged (5.0K reputation)Supercharged (5.0K reputation)Supercharged (5.0K reputation)Supercharged (5.0K reputation)

Group: Moderators
Last Active: 1 hour ago
Posts: 3.7K, Visits: 322.9K
Dan:

Nice pictures, great report.  What is the coupe, '41-'48, Ford or Merc?

As for the water pump, since cost isn't a major issue, is rebuilding the old one a viable learning experience for the students?  It's not likely they will ever have to do it again, kits are not usually locally available, but rebuilt and new pumps are.

Keep the reports coming.

John in Selma, IN

John - "The Hoosier Hurricane"
http://www.y-blocksforever.com/avatars/johnf.jpg

Unibodyguy
Posted 16 Years Ago
View Quick Profile
Supercharged

Supercharged (240 reputation)Supercharged (240 reputation)Supercharged (240 reputation)Supercharged (240 reputation)Supercharged (240 reputation)Supercharged (240 reputation)Supercharged (240 reputation)Supercharged (240 reputation)Supercharged (240 reputation)

Group: Forum Members
Last Active: 13 Years Ago
Posts: 240, Visits: 848
Dan,

     thanks for the progress updates. Thats so cool you have them doing a Yblock insted of something else.

                                                          Michael

Michael

Sandy Valley, NV

GREENBIRD56
Posted 16 Years Ago
View Quick Profile
Supercharged

Supercharged (2.3K reputation)Supercharged (2.3K reputation)Supercharged (2.3K reputation)Supercharged (2.3K reputation)Supercharged (2.3K reputation)Supercharged (2.3K reputation)Supercharged (2.3K reputation)Supercharged (2.3K reputation)Supercharged (2.3K reputation)

Group: Forum Members
Last Active: Last Year
Posts: 1.7K, Visits: 102.7K
I once saw a report about the use of the "Glyptol" electric motor sealant on the inner surfaces of some test engines (NASCAR). Engine oil temperature was said to have risen with that single difference between two otherwise equal motors. It was said to relate to the speed at which the oil returned to the sump.  

Glyptol will certainly seal the cast surfaces and prevent contamination of the oil with grit, But - and I have seen this with the big gearcases on the mining machines I often work with - it also provides a very slick surface that returns the oil quickly to the sump - without absorbing enough heat from the oil. Sand blasting (and then scrubbing like hell) the inside of the gearboxes (removing the "oil proof" coating) caused their skin temperature to go up - and the sump temperature to reduce (and that is where I was scavenging lubricant to spray into the bearings and gear tooth meshes). This prevented us from having to go to the expense (and additional failure risk) of pumped coolers.

I have heard that there are some aerospace coatings - that seal surfaces well and ....increase the heat absorbtion rate. It is also something I have not researched enough to be competent at explaining.  It might be a worthwhile thing for engine builders to look in to.

http://forums.y-blocksforever.com/uploads/images/9ea2bf28-00c4-4772-9ac7-d154.jpg 
 Steve Metzger       Tucson, Arizona

Dan
Posted 16 Years Ago
View Quick Profile
Supercharged

Supercharged (240 reputation)Supercharged (240 reputation)Supercharged (240 reputation)Supercharged (240 reputation)Supercharged (240 reputation)Supercharged (240 reputation)Supercharged (240 reputation)Supercharged (240 reputation)Supercharged (240 reputation)

Group: Forum Members
Last Active: 14 Years Ago
Posts: 240, Visits: 1.1K
Interesting thought on the glyptal raising oil temp., kinda like removing the thermostat and raising the coolant temp. Never have used the stuff before - new territory for me, interested to see how it works.

Yeah a rebuild kit is $20ish and a new (remanned I'm sure) is like $40ish so cost wise its a wash. I think rebuilding one would be a good learning experience, in fact one of the students started on it this morning. How does the hub come off the shaft? Do we use a puller and pull it off? Cant find anything holding it on???

The coupe is a '46 merc...

GREENBIRD56
Posted 16 Years Ago
View Quick Profile
Supercharged

Supercharged (2.3K reputation)Supercharged (2.3K reputation)Supercharged (2.3K reputation)Supercharged (2.3K reputation)Supercharged (2.3K reputation)Supercharged (2.3K reputation)Supercharged (2.3K reputation)Supercharged (2.3K reputation)Supercharged (2.3K reputation)

Group: Forum Members
Last Active: Last Year
Posts: 1.7K, Visits: 102.7K
Dan - The nose hub where the fan mounts will (nornally) simply press off straight off the shaft.

Keep this in mind later when you are trying to get all of the pulleys lined up (and thus keep the belt on there). That flange can be relocated at just the right spot to line up with the crank pulley if you dry assemble the waterpump (don't glue in the gaskets) for a trial.

http://forums.y-blocksforever.com/uploads/images/9ea2bf28-00c4-4772-9ac7-d154.jpg 
 Steve Metzger       Tucson, Arizona

Dan
Posted 16 Years Ago
View Quick Profile
Supercharged

Supercharged (240 reputation)Supercharged (240 reputation)Supercharged (240 reputation)Supercharged (240 reputation)Supercharged (240 reputation)Supercharged (240 reputation)Supercharged (240 reputation)Supercharged (240 reputation)Supercharged (240 reputation)

Group: Forum Members
Last Active: 14 Years Ago
Posts: 240, Visits: 1.1K
good tip, thanks!
Dan
Posted 16 Years Ago
View Quick Profile
Supercharged

Supercharged (240 reputation)Supercharged (240 reputation)Supercharged (240 reputation)Supercharged (240 reputation)Supercharged (240 reputation)Supercharged (240 reputation)Supercharged (240 reputation)Supercharged (240 reputation)Supercharged (240 reputation)

Group: Forum Members
Last Active: 14 Years Ago
Posts: 240, Visits: 1.1K
We pulled the fan hub off with no real problem, the clip that goes into the water pump snout is missing. Does the impellar come off the shaft or is it supposed to stay on? If the imp. is supposed to stay the shaft presses out the back of the pump? If the imp. does come off is the shaft supposed to press out the front?? All I have is an exploded parts diagram w/o any direction on which way to proceed??? thanks-
GREENBIRD56
Posted 16 Years Ago
View Quick Profile
Supercharged

Supercharged (2.3K reputation)Supercharged (2.3K reputation)Supercharged (2.3K reputation)Supercharged (2.3K reputation)Supercharged (2.3K reputation)Supercharged (2.3K reputation)Supercharged (2.3K reputation)Supercharged (2.3K reputation)Supercharged (2.3K reputation)

Group: Forum Members
Last Active: Last Year
Posts: 1.7K, Visits: 102.7K
The shaft/impellor/bearing/seal - all come out the backside (block side) together.

What all came in your repair kit? I've never really seen one - just tore down an old rusty pump to get the dimensions off the impellor. The "clip" was left behind in the nose of the housing..........the bearing fit seemed to hold everything together in my "antique". The clip must set the forward position of the bearing. 

http://forums.y-blocksforever.com/uploads/images/9ea2bf28-00c4-4772-9ac7-d154.jpg 
 Steve Metzger       Tucson, Arizona

Dan
Posted 16 Years Ago
View Quick Profile
Supercharged

Supercharged (240 reputation)Supercharged (240 reputation)Supercharged (240 reputation)Supercharged (240 reputation)Supercharged (240 reputation)Supercharged (240 reputation)Supercharged (240 reputation)Supercharged (240 reputation)Supercharged (240 reputation)

Group: Forum Members
Last Active: 14 Years Ago
Posts: 240, Visits: 1.1K
Dont have the kit yet, maybe should've waited till we got it before we took it apart Smile think I'll buy this kit http://www.parts123.com/parts123/yb.dll?parta~partsort from Mac's, only one I've found but then I havent looked real hard either...

We tried pressing everything out the engine side of the pump and met with alot of resistance. Found an old Motors manual that said to pull the impellor of the shaft - our impellor was already broken so we pressed everything out the front of the pump - came apart real easy that way, guess I just need to order the rebuild kit now.

Inside of the pump is pretty rusty, gonna try soaking the whole thing in vinegar after it gets cleaned - had pretty good luck in the past with that method to remove rust.


Reading This Topic


Site Meter